Bonsaikapilaas : #learnBonsai
='data:blog.title' itemprop='name'/>

pinterest

Showing posts with label #learnBonsai. Show all posts

Jun 21, 2020

Bonsai And Bonsai photoshoot . How to get best photo of your Bonsai.

Photographing A Bonsai : Once we finished shaping Bonsai Plant, we feel like capture the beauty of our creation in a frame. Here I am sharing some important points of Photography . These I learnt with experience, I would like to share with you all. We can start our photography shoot with our mobile. we don't need any expensive camera, Simple camera is also makes lots of difference. Then a normal simple tripod of for stable photos. For taking  good photos one need not to be a great photographer just follow some easy steps and your Bonsai photos will be marvelous. 
Back drop for photo shoot : First to show your Bonsai clearly with depth we should have a solid back ground with out any distractions. If you have plain wall that also makes a good back ground. Otherwise next step we can use Black or White colour or any other colour of plain cloth is makes a superior back ground.  when you selecting a cloth it should not be a shiny cloth, because it reflects the light.  
 
The cloth can be a velvet or 100% cotton cloth or Lekera cloth is gives a best back ground. Some times if your Bonsai is small then our coloured chart paper is perfect as a back drop. Back drop should be hang from a stand or with some support . please try to hang the cloth  straight down with out any folds.. The folds distracts the view of  main image. Our Bonsai plant can be placed in front of the backdrop on a table. We can put same cloth on table and place the plant on table. Then complete back ground will be full black and entire viewers concentration will be on Bonsai plant. Some times we can place turntable on the this table, that also gives a elegant look.

 In this photo table is covered with the same backdrop cloth

A turn table is place on the first table to place Bonsai plant

Chart paper also can be used as back drop in photography.


One more option is we can place glass sheet below Bonsai plant with black or white back drop, the reflection of the plant in the glass gives a beautiful look.


Here below we can see a detail view of White and Black drop . Both of them are good . according to our interest we can use any back ground. So always one back drop without any interruption is compulsory to show your beauty of the Bonsai  plant. 
 
To be continued in next posts with other tips like tripod placement and exposure etc.....


May 22, 2020

Tamarind as a Bonsai tree

How to make tamarind as a bonsai.
Thank you friends for your comments and like for my Tamarind Bonsai plant.
Many Bonsai friends were asking for whats age of the plant and how to grow tamarind from a seed. which type of soil and watering. 
My Tamarind Bonsai plant is growing for more fifteen years,  Tamarind is a tropical plant. Growing tamarind Bonsai from a seed is easy, just soak tamarind seed in warm water over night and next day put seed in half soil and half coco peat mix. the seeds start germinating within two weeks, some times tamarind seeds fallen on the ground also develop in to plants in favorable conditions. At my place I can see many Tamarind plants growing from seeds. Once it starts germinating let it grow for two months and shift the plant in to a big pot with soil mix of garden soil, manure and three to four mm brick pieces ( without brick powder, remove brick powder by sieving) other wise it blocks drainage of the soil. instead of Brick pieces we can use pumice stones also. they are very light and porous.1:1:1. ratio. one soil, one manure and one pumice stones. Usually Tamarind is not choosy plant for soil, it can grow any type of soil, But if you want better and fast growth it is better to use well drained and manure soil. 
Let the plant grow in big pot at least for seven years, because when the plant is growing from seed it takes long time to start flowering , long time means more than 8 to 10 years.During this period wiring, pruning can be done to give a shape to Tamarind plant on regular basis.  Repoting I did once in a year up to 7 years, then the plant shifted to Bonsai pot. For the last two years it started flowering, Through this long journey plant it has seen many seasons. In autumns it looks very pretty with yellow leaves falling down.
This photo was taken in 2016 fall season


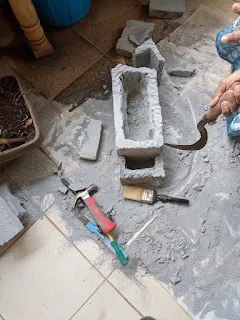
Then in spring plant gains energy and will with fresh green leaves. Once in two years re potting is done fresh soil and removing fine roots by making place for fresh energetic fiber roots. This year defoliation is done on May 15 , it took two full days to remove all leaves.

Tamarind Plant Before Defoliation

Ramification can be done after the plant grows extensively with whole long branches and green leaves.  Now Selection of branches  and giving a style to the plants is a key factor in designing a Bonsai plant. With Defoliating all the leaves will be removed so we can see through the plant clearly all the branches. So selection of branches for Pruning and wiring will comfortable and easy.


When the plant is young means 7 to 8 years .it needs lots of moisture in the soil for its proper growth. the soil should be moist but not wet. Once the plant matures let the soil dry in between watering  In summer once in a day, if the plant is open to full sun light and the temperatures are more than  38 digress centigrade two times of watering is necessary  and In winters once in day.
Regular fertilizing once in a month is necessary for healthy growth of the plant With NPK fertalizer. N is Nitrogen, P is for phosphorous and K is potassium. For flowering Plants P and K are more important for the plant for bearing fruits and flowers. During growing season it is better to  provide liquid spray of micro nutrients. 
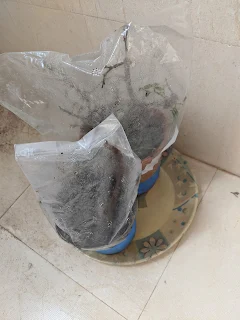
Tamarind Plant From Branches / Vegetative growth.
Tamarind plants can be grown from seeds and vegetative cuttings also.  For Vegetative growth take less than pencil thickness branch and apply root all hormone or cinnamon powder with honey apply near the cut and keep that branch in a pot with garden soil. cover the entire pot with plastic bag . so moisture will be there within one and half month these branches will have new fine roots. In second picture you can see moisture inside plastic bag.

                                                                                                                          
The plants grown from vegetative growth will start fruiting with in 6 years.
 Now I am trying to grow Tamarind Branches  in water . Take less than pencil thick branch and as soon as you cut it keep it is normal water. then take a glass  3/4 of water add root all hormone and place  plant cuttings in  the glass, every three days change water again add root all hormone. after one half month we can see roots and you can keep it in soil with equal portions of soil with coco peat. 


Tamarind is a leguminous tree, because it gives legumes . If you can take  proper care plant can survive more than 200 years. The Gnarled and twisted tamarind trees spread wide and give a beautiful as a bonsai tree. 


May 13, 2020

How to make beautiful bonsai pot Easily at home.


Bonsai is unlimited imagination to your creativity. I tried to create different pot for Premna plant.


A beautiful cement block which is light and can be carved with a chisel, drilling machine, and hexa blade. here everything explained with photos. 
Tools required:


Cement Block before carving


                                                                  Started Carving with chisel,and drilling machine removed all the solid materiel from inside 


Drainage hole is also made at the bottom of the pot . 


and made some stone like carvings by knife and drilling machine 

If you want you can make drainage holes at the bottom of the pot.
And colors used are acrylic colors, not oil colors.


the final product is this. then it is colored with Fevicryl brown, black and yellow. First put the black color and on brown , then put yellow color
let the color dry out.
Bonsai is a Beautiful Art there is no limit to our creativity.

Then Nursery Plant Premna  is place inside the pot and soil is added. Now  it is looking as a old wood and the plant  coming up nicely. Any one can do this pot. Shaping premna plant. pruning and ramification will be done depending on the development of the plant just started.

May 11, 2020

How to make a Shohin Bonsai of Buxus

Shohin Bonsai are the small Bonsais of small in size means , Height of these Bonsais are below 8 inches. Usually Miniature Bonsais are classified in to three sections depending on their heights.
Shohin Bonsai is of below 8 inches
Mame Bonsai is of below  6 inches
Shito Bonsai is of below  3 inches
Keishi Bonsai is of below  1 inch
Developing styling a miniature Bonsai is a difficult job of creating a style. Plant will having less no of branches and the size of the plant is also small. selection of a will be a ramification is very selective job.
Here in this post Buxus microphylla is selected and made into shohin bin of below 8 inches. Now we will go  in to detail transformation of nursery plant in to shohin  Bonsai is explained . Then after studying this we will go to other small Bonsais. 
Buxus plant was bought from a nursery long back may be 8 to 9 years back. I will share photo of the plant that time.
In nature we will see many different styles of Plants . One of it is Multitrunked plants. Multi trunk Trees are having the habit of developing more sprouts from the base of the tree, but only some will survive and become multi trunk style.


First photo is the plant bought from nursery. it was kept like that for two years. then started working on the plant. By studying the plant I thought of this plant has a good potential to be a multi trunk or Raft style and to become a shohin Bonsai. then work was started on keeping the future style of the Bonsai by removing  the branches which were not fitting in to Bonsai design. I stared working in spring . 
Second photo i exposed the main trunk line by eliminating branches and keeping some selected one and did ramification by clip and grow method . then I kept the plant at a sunny place and did regular fertilizing. My Buxus Shohin Bonsai became strong and ready for next ramification.
Then slowly Plant is started getting new leaves.


Below is videolink to see how plant is transformed to shohin Bonsai

The above link will clearly will show you how the Boxwood plant made in to a  Shohin Bonsai..i will share recent photo of the plant

Apr 12, 2020

Defoliating a Bonsai plant


Defoliating a Ficus Bonsai plant


Defoliating means removing or cutting down the leaves of Bonsai plant. It is a regular practice all Bonsai masters do it their deciduous trees during the autumn season before spring. First we will see what are deciduous trees. Deciduous trees are usually Maple,oak mostly giant flowering trees around the region of equator , between tropic of cancer and tropic of Capricorn. Deciduous means  fall off or shedding the leaves. Most of these tropical plants they shed their leaves during Autumn season after their flowering season is over.  Leaves of  these plants are broad and the canopy of tree is round are umbrella shape. Ficus is Pan tropical ever green tree with broad leaves. Ficus tree sheds their leaves to reduce the leaf foliage and evaporation of water during dry season to control water storage in the plant. As soon as monsoon returns new leaves starts developing.
In Bonsai We do regular defoliation to reduce the size of the leaves. Bonsai is a miniature tree , so if the plant is having Big leaves as it in nature the proportion of the leaves and size of the plant won't match. To have Balance and Harmony of the plant and to get a pleasing look of the tree Most of the Bonsai masters reduce the size of the leaves by cutting them. Usually it can be done twice a year to keep the Bonsai tree in a perfect shape. Some artists do defoliation before wiring the plant to have a clear look tree and the branches.
Before starting defoliation two points are very important.
First overall Health of the tree
Second don't do defoliation on a freshly re potted plant
To defoliate we need a tool like sharp leaf cutter
To Defoliate first select a plant which is healthy, energetic with full leaves without any infection . Start removing leaves leaving the stalks of the leaf . Remove only the leaf . stalks will fall down on its own.  see the picture below .
Below video gives How to reduce the size of a leaf. For More Information Click on below Link


This Ficus Plant Leaves are already in size when compared to the natural leaf growing in the Nature.