Bonsaikapilaas : nga rakau bonsai
='data:blog.title' itemprop='name'/>

pinterest

Showing posts with label nga rakau bonsai. Show all posts

Aug 25, 2020

Perfect way to grow Branch cuttings and getting a thick trunk Bonsai in less time

Most of the trees can be grown from branches.

For multiplying trees from branches here are the few tips to follow , then one can be successful developing cut branches into huge trees.

Seasons : Most important is weather plays a big role in development of branches. into plants. For this environment should be friendly with lots comfortable weather for its plants growth. First is Rainy season which is perfect for its plants growth. During this season branch cuttings planted in soil can develop roots in less time because of cool temperatures and moisture. Second best season is Spring season that is February and March. During this time weather is pleasant and comfortable for plants development. during this time day becomes longer and will be more sunlight and weather will be warm and plants will have more fresh green leaves. Branch cuttings planted in soil will have more comfortable time to develop more roots and can become individual plants in shorter time.

Perfect cut: A perfect cut from a healthy Branch of a tree if more important. first select a hale and healthy branch and make cut in 45 degrees angle with a sharp knife below the node of a leaf because roots develop below the leaves. one more important thing keep at least one node on the stem, so from that leaf axil buds development will be there. In nature most of the plants develop roots below the leaf node, But some plants develop roots at inter nodal space also.


 As soon as a cut is made keep that branch in a tub filled with water. by keeping like this it prevents the branch cells from drying out. if the cut portion becomes dry, development of roots will be difficult branch can die back. Keep it in water only for little time till your potting soil is ready. Once it is ,then shift cut Branch to the potting bag.

Potting Soil: Potting soil for development of roots from branches should have proper drainage and hold the moisture. When Moisture retention capacity is more it activates the cell and will have more progress in roots development. Soil should not be more water or less water, it should be just enough for its growth. There should be free flow of Oxygen in the soil which is more important for the cuttings of the branch to develop roots. For this Best soil is Coco peat or perlite or peat moss or vermiculate sometimes sand. Take a plastic bag or pot fill with cocopeat or any other potting soil.

Use of Root all hormone: There three ranges of root all hormone is available in market. Light Medium and strong root hormones. Take medium root hormone. Take out the branch cutting from water and apply Root all hormone at the base where cut was made and place it in the potting soil and water the branch. One more thing if you don"t have rooting hormone , home made hormone is Honey and cinnamon powder mix them together and apply on the cut area. it also acts as Rooting hormone, Honey is glucose gives energy to develop roots and cinnamon powder acts as insecticide or fungicide.

Watering: Now very important one is watering. Keep the potting soil moist by watering daily. It will takes three to five months to develop roots. Then the the branch will be a plant on its own. It can be shifted a pot with garden soil.

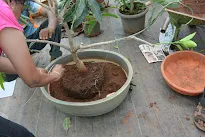
Below are some photos how the development of roots are taking place


As soon as a cut is made, keep it in the soil. keep a garden bag ready for the branch to be kept. . Then mix soil and cocopeat equal portions, mix them and put it in a garden bag. Take branch cutting, place it in a bag and keep it in a shady place and water the branch cutting. Wait for two to three months until the branch develops roots and let it grow it . then after three months supply fertilizers for  more growth..  Next year you can shift it into a Bonsai pot. Sometimes you can keep it in the garden bag for more than three to five years for more growth and thickening of the trunk line.


Root Development from a Branch cutting

Let the branch grow for three months. Once the roots developed, shift the plant to a good soil with manure. Then after one year start training as Bonsai plant. Most of the Bonsai plants we are getting from nursery are developed from Branch cuttings.

https://www.youtube.com/user/kapilaas                                                                          

Jun 26, 2020

How to make mango plant in to a Bonsai tree. Part One

Mango Bonsai
Mango is a favorite plant of many Bonsai lovers. When the plant is bending with the heaviness of the fruits its magnificent look, no one wants to miss that glance of beauty of the plant. With little care, Mango plants give back more fruits. Making a mango plant into a Bonsai mango tree involves lots of patience. Mango plant can be grown from seed and it can be grown from grafted plants also. when mango grows from seed it takes lots of time to give fruits. If it is growing in the ground it takes five to ten years to start fruiting. Then if it is growing in a pot it takes more longer time at least 10 years because of its limited space in the pot. Not only that it is due to the irregular practice of giving fertilizers missing the re-potting time also one of the factors to make the plant slow down the fruiting stage. If one can take care of these factors it can arrive at its fruiting stage in less than eight years. 


This Mango plant is growing from a grafted material and started giving fruits at the age of three years. When the plant is in the growing stage if one can provide it with proper fertilizers it attains its mature stage as early as possible as if it is growing in the ground. once it starts giving fruits, the plant is shifted to Bonsai pot. I feel the mango plant can be made into Bonsai when it starts flowering and giving fruits because without fruits one can not enjoy mango Bonsai. 
      
    
Nursery plant is shifting to a Bonsai pot.
Before  making Mango as a Bonsai half of the soil is removed without disturbing the roots and some soil is left it on the plant. so  settlement the plant in Bonsai pot will be comfortable with its old soil near the roots. Then the survival chances of the plant will be good,  it is mostly when we are doing repotting during hot season months.
Always re potting depends on of any Bonsai plant depends on many factors. 
1. Species of the plant 
2. Age of the plant       
3. Health of the plant   
4. Tropics or Region of the country 
5. Climate of the country weather conditions
Species of the plant : The plants have different root systems. The root system of some of the are fibrous root system, some plants like mango have tap root system. While re potting we shouldn't cut complete taproot, keeping one third of tap root depending on the health of fibrous feeder roots. If fibrous roots are healthy, we can shorten tap root. The fibrous or feeder roots close to the main trunk line should not be removed.  They help the plant to survive the stress of re potting.  

 Age of the plant : Age of the plant makes lots of difference in Re potting. If the plant is young repotting to be done once in a year otherwise at least once in two years. that makes the plant to develop more feeder roots which absorbs more nutrients and the plant growth will be fast and plant gains enegry to develop more branches.

Health of the plant : Health of the is compulsory . If the plant is not healthy re potting makes the plant weak, because of the re potting the plant under going strain and it may lead plant to develop more pressure it may lead plant to die back.
Tropics or Region of the country : There are mainly three types of zones are there on Earth. one is tropics and another is temperate and polar. In tropical Zone area the temperature are always hot , hotter , hottest. that time temperatures will go as high as more than 40 degrees.if  care cant be taken after re potting  during that time survival chances of plant will be less.  In temperate zone temperature will cold and the plants growing in those regions will be having winter dormancy. During dormancy period plants go in to hibernation because of cold weather, there wont any development . so it is not advisable to do re potting during that time.
Climate of the country weather conditions: Re potting time  also depends on seasons. the plant development during spring season more . That is the best time to do re potting of the plant. 


Wiring is done by just bending the branches and tieing them to the main trunk line.Mango Plant grows in any type of soil its not choosy. mostly it likes acidic soil for proper growth. Garden soil , sand not fine sand and manure these are the main ingredients of soil. Once the plant settles start Fertilizing with NPK fertilizers. While in growing stage Nitrogen fertilizer is compulsory, after five years potash and phosphate fertilizer is needed for the plant to have a healthy crop, Start fertilizing before or early spring season  to get more fruits. Once the flowering season is over, cut back the branches and provide the plant with good food. Sometimes spraying liquid fertilizers benefit  the plant with more nutrients and energy for the plant to be ready for next season. 


The Photo Below  is the Plant After Six months


To make your Mango plant ready for next season flowering ,  We have to start preparing in August and September months.First let the soil dry for four days and Remove the top soil two to three inches and fill that space with organic manure like cow dung or any organic manure and add DAP fertilizer for more flowers and fruits.
Re potting of young mango Bonsai  can be done once in a year in rainy season, then if the plant is more than ten years old re potting to be is once in three years. 
Mango Bonsai is a Beautiful tree with hanging Mango fruits.

Enjoy Growing mango Bonsai..


Jun 22, 2020

Bonsai And Bonsai photoshoot . How to get best photo of your Bonsai. Part 2

In last post we learnt every thing about the Back drop and its colors and how to use that.
Tripod setting for Photo shoot:
Tripod is an important instrument.in photography, if you place your camera on a tripod, , you can easily adjust shutter speed and time with out any jerks. Small jerk also makes your photo shaky without any clear, sharp picture. With Tripod we can adjust of the height the  camera with the same level of the plant with its position and angle. Fix  camera or mobile in tripod and adjust the height of tripod.


camera focus point and should match with pot level. The plant trunk base should and the camera eye will be in the same level. So plant will be visible as it is. we can get true image with out any Parallax error.


If you are looking at plant from an angle the picture you are getting wont be perfect , In out come photo the plant's image will be at an angle  and trunk line can be covered with branches. so its not proper way of getting a good picture.


In the above photograph the focus of camera is going above canopy of the plant. So in out come image of the plant the trunk line looks thin and  young.
camera Angle focus is from the Above the plant


Focus of camera in first photo it is on left side, and in second photo it is on right side  

The placement of tripod with camera and plant should be in 180 degrees line. If tripod is on right side or left side the image we are getting is not a actual image.
Tripod helps to take good photos when there is minimum light in the room, that time we need more shutter speed.  When  using camera with hand slight movement also reduces shutter speed, resulting in blur or grainy images.If camera is placed on tripod there wont be any  movement of the hand, On tripod minimum amount of movement resulting  best photos of Bonsai plants. If you dont have tripod there many home made tripod videos are there online, you can check them. you can make your own. The main use of tripod is stability for camera with least motion and best photo shoot..


To be continued in next posts with other tips like tripod placement and exposure etc.....

Jun 21, 2020

Bonsai And Bonsai photoshoot . How to get best photo of your Bonsai.

Photographing A Bonsai : Once we finished shaping Bonsai Plant, we feel like capture the beauty of our creation in a frame. Here I am sharing some important points of Photography . These I learnt with experience, I would like to share with you all. We can start our photography shoot with our mobile. we don't need any expensive camera, Simple camera is also makes lots of difference. Then a normal simple tripod of for stable photos. For taking  good photos one need not to be a great photographer just follow some easy steps and your Bonsai photos will be marvelous. 
Back drop for photo shoot : First to show your Bonsai clearly with depth we should have a solid back ground with out any distractions. If you have plain wall that also makes a good back ground. Otherwise next step we can use Black or White colour or any other colour of plain cloth is makes a superior back ground.  when you selecting a cloth it should not be a shiny cloth, because it reflects the light.  
 
The cloth can be a velvet or 100% cotton cloth or Lekera cloth is gives a best back ground. Some times if your Bonsai is small then our coloured chart paper is perfect as a back drop. Back drop should be hang from a stand or with some support . please try to hang the cloth  straight down with out any folds.. The folds distracts the view of  main image. Our Bonsai plant can be placed in front of the backdrop on a table. We can put same cloth on table and place the plant on table. Then complete back ground will be full black and entire viewers concentration will be on Bonsai plant. Some times we can place turntable on the this table, that also gives a elegant look.

 In this photo table is covered with the same backdrop cloth

A turn table is place on the first table to place Bonsai plant

Chart paper also can be used as back drop in photography.


One more option is we can place glass sheet below Bonsai plant with black or white back drop, the reflection of the plant in the glass gives a beautiful look.


Here below we can see a detail view of White and Black drop . Both of them are good . according to our interest we can use any back ground. So always one back drop without any interruption is compulsory to show your beauty of the Bonsai  plant. 
 
To be continued in next posts with other tips like tripod placement and exposure etc.....