Bonsaikapilaas : starting a bonsai
='data:blog.title' itemprop='name'/>

pinterest

Showing posts with label starting a bonsai. Show all posts

Jun 22, 2020

Bonsai And Bonsai photoshoot . How to get best photo of your Bonsai. Part 2

In last post we learnt every thing about the Back drop and its colors and how to use that.
Tripod setting for Photo shoot:
Tripod is an important instrument.in photography, if you place your camera on a tripod, , you can easily adjust shutter speed and time with out any jerks. Small jerk also makes your photo shaky without any clear, sharp picture. With Tripod we can adjust of the height the  camera with the same level of the plant with its position and angle. Fix  camera or mobile in tripod and adjust the height of tripod.


camera focus point and should match with pot level. The plant trunk base should and the camera eye will be in the same level. So plant will be visible as it is. we can get true image with out any Parallax error.


If you are looking at plant from an angle the picture you are getting wont be perfect , In out come photo the plant's image will be at an angle  and trunk line can be covered with branches. so its not proper way of getting a good picture.


In the above photograph the focus of camera is going above canopy of the plant. So in out come image of the plant the trunk line looks thin and  young.
camera Angle focus is from the Above the plant


Focus of camera in first photo it is on left side, and in second photo it is on right side  

The placement of tripod with camera and plant should be in 180 degrees line. If tripod is on right side or left side the image we are getting is not a actual image.
Tripod helps to take good photos when there is minimum light in the room, that time we need more shutter speed.  When  using camera with hand slight movement also reduces shutter speed, resulting in blur or grainy images.If camera is placed on tripod there wont be any  movement of the hand, On tripod minimum amount of movement resulting  best photos of Bonsai plants. If you dont have tripod there many home made tripod videos are there online, you can check them. you can make your own. The main use of tripod is stability for camera with least motion and best photo shoot..


To be continued in next posts with other tips like tripod placement and exposure etc.....

Jun 21, 2020

Bonsai And Bonsai photoshoot . How to get best photo of your Bonsai.

Photographing A Bonsai : Once we finished shaping Bonsai Plant, we feel like capture the beauty of our creation in a frame. Here I am sharing some important points of Photography . These I learnt with experience, I would like to share with you all. We can start our photography shoot with our mobile. we don't need any expensive camera, Simple camera is also makes lots of difference. Then a normal simple tripod of for stable photos. For taking  good photos one need not to be a great photographer just follow some easy steps and your Bonsai photos will be marvelous. 
Back drop for photo shoot : First to show your Bonsai clearly with depth we should have a solid back ground with out any distractions. If you have plain wall that also makes a good back ground. Otherwise next step we can use Black or White colour or any other colour of plain cloth is makes a superior back ground.  when you selecting a cloth it should not be a shiny cloth, because it reflects the light.  
 
The cloth can be a velvet or 100% cotton cloth or Lekera cloth is gives a best back ground. Some times if your Bonsai is small then our coloured chart paper is perfect as a back drop. Back drop should be hang from a stand or with some support . please try to hang the cloth  straight down with out any folds.. The folds distracts the view of  main image. Our Bonsai plant can be placed in front of the backdrop on a table. We can put same cloth on table and place the plant on table. Then complete back ground will be full black and entire viewers concentration will be on Bonsai plant. Some times we can place turntable on the this table, that also gives a elegant look.

 In this photo table is covered with the same backdrop cloth

A turn table is place on the first table to place Bonsai plant

Chart paper also can be used as back drop in photography.


One more option is we can place glass sheet below Bonsai plant with black or white back drop, the reflection of the plant in the glass gives a beautiful look.


Here below we can see a detail view of White and Black drop . Both of them are good . according to our interest we can use any back ground. So always one back drop without any interruption is compulsory to show your beauty of the Bonsai  plant. 
 
To be continued in next posts with other tips like tripod placement and exposure etc.....


May 13, 2020

How to make beautiful bonsai pot Easily at home.


Bonsai is unlimited imagination to your creativity. I tried to create different pot for Premna plant.


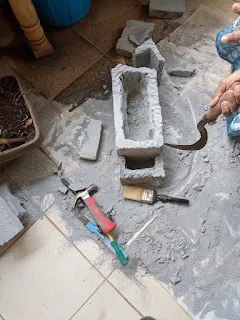
A beautiful cement block which is light and can be carved with a chisel, drilling machine, and hexa blade. here everything explained with photos. 
Tools required:


Cement Block before carving


                                                                  Started Carving with chisel,and drilling machine removed all the solid materiel from inside 


Drainage hole is also made at the bottom of the pot . 


and made some stone like carvings by knife and drilling machine 

If you want you can make drainage holes at the bottom of the pot.
And colors used are acrylic colors, not oil colors.


the final product is this. then it is colored with Fevicryl brown, black and yellow. First put the black color and on brown , then put yellow color
let the color dry out.
Bonsai is a Beautiful Art there is no limit to our creativity.

Then Nursery Plant Premna  is place inside the pot and soil is added. Now  it is looking as a old wood and the plant  coming up nicely. Any one can do this pot. Shaping premna plant. pruning and ramification will be done depending on the development of the plant just started.

Mar 10, 2019

Bonsai Art for Beginners


Bonsai is an art, Enthusiasm to learn, creativity to style a plant, makes you a great Bonsai artist. it is a live art. One can start Bonsai making by attending Bonsai classes regularly near by area where you are staying . That is the way one to one coaching will be there , your master will teach you with hands on experience. so your plants will be in safe hands. if any thing goes wrong with the plant master will be there to guide you properly.
Another way of learning Bonsai is by watching videos of Bonsai. This way is trail and error method. sometimes you will be successful by making a Bonsai plant, other times you lost some plants.
One more method is attending on line classes, that is master will be on other side of tv and you will be watching his Bonsai making live class, here one can talk with the masters and interaction will be there, your questions will be answered.
One can make Bonsai by reading books, and can start making your own Bonsai .
By attending Bonsai exhibitions and having discussions with Bonsai people also helps to get some knowledge in Bonsai making.
Bonsai is nothing but it is replica of nature, When you are looking at Bonsai plant it should look like huge tree growing in shallow container in a miniature form.
Bonsai plant making is pioneering in to the Art of Bonsai, This art needs lots of concentration, patience. Many Years of rapport with the Bonsai plant gives a beautiful matured Bonsai. To make good looking Bonsai, it needs years of training like pruning, wiring, shaping.
You can follow my blog how to make a bonsai plant.

A Bonsai after many years of training              Ficus Bonsai Under training              

Links for Bonsai Making Blogs

Bonsai Plant making

Styling a Bonsai


Apr 29, 2018

Selection of Branches for styling Bonsai Plant - Part Two

Selection of Branches for styling Bonsai Plant - Part Two


Styling Bonsai branches is very important because it gives a good look to the plant . Here in this video it is clearly shown how to select  branches, draw a  future plant, and how to give a shape to the Bonsai plant. Re potting of Plant and selection of pot was shown clearly in this video.
Same plant after Six months of training


                                                               Plant with full flowers

Link of Part one Blog of Bonsai Styling
http://www.kapilaas.com/2018/01/selection-of-branches-for-styling.html