Bonsaikapilaas : #Beginners
='data:blog.title' itemprop='name'/>

pinterest

Showing posts with label #Beginners. Show all posts

Apr 6, 2023

Watering Schedule for Bonsai plants

 Watering Schedule

A watering schedule is very important for the plant's proper root growth Because when the roots are healthy the plant will be healthy. Water contains oxygen and hydrogen molecules. The supply of oxygen from vascular tissue to the whole body of the plant depends on the moist level of the soil. 

The watering schedule depends on many factors like

Species of the plant, Seasons of that time, The region or country where the plant is growing, and The ingredients used in Soil for proper drainage, the size of the Bonsai pot, the health of the plant.

Species of Plants, if the plant is coniferous like pine and evergreen plants growing in temperate temperatures need 2 to 3 times a week in the freshly repotted plants for two to three months. then once a week to the plant.  The moist level of humidity in weather in temperate zones is high, so the water evaporation from the soil is very less. then the plants won't need frequent watering.

The Bonsai soil also plays a big role in holding water. If the soil is having well drainage and moisture-holding capacity, once-a-day watering is needed in the Asian Tropical region. The Tropical regions away from the coastal place are having dry weather. So the frequency of watering is more because the dry and less humidity in weather makes the soil dry quickly.

The Big Bonsais will be in big pots, and the down portion of the soil will remain wet all day. The medium and mame Bonsai are in small pots. they won't hold water for more time. Then the watering schedule is different.

Just re-potted Bonsai plants need care because lots of root cutting makes the plant weak. During that time moist soil allows the plant to come out of the stress and gain energy to produce new leaves and new roots.

The main factor of watering is there should not be more water or less water. 
The soil in the pot should be watered thoroughly without any dry places. Once the plant is watered the extra water should come out of the drainage holes in a few seconds. 

To check the correct moisture level of the soil in the pot, put a finger in the soil, if the soil is wet, there is no need to water it. If the soil is dry water the plant. Once the plant is settled in bonsai soil, allow the plant to dry out soil in between waterings. Water is the main source of energy for the plant to grow happily.

Jul 11, 2021

How to Make cascading Style Bonsai with Ficus plant

Cascading Style Bonsai 


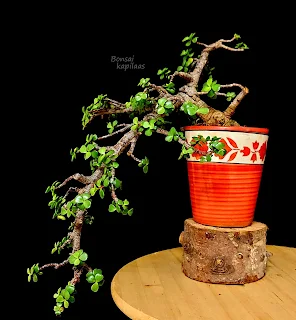
Cascade style is a interesting style in Bonsai. Usually In nature plant grows to wards the sky , but here in this style Plant is growing towards gravity downwards. It makes the plant attractive and unique. When water from top of the mountain falls down it takes makes interesting path in cascading way. 

The trees Growing on peak of the mountain generally effected by Natural disasters like heavy winds, thunder storms, sun burns etc... During that top branches break down and there wont be proper growth there. then the branches at the down portion of the trunk where there is less effect of wind try to grow down . then slowly development of tree will be on earth bound branches.


courtesy google image

Here in this photo we can clearly see the effect of the wind and development of earth bound branches. Bonsai is an art that nature and Bonsai art is interlinked. Creation of Bonsai style is entirely depends on the nature of the growth and evolution of the plant as it gains age. Keeping this in mind we are creating our Bonsai trees. 

Our Bonsai Lovers last month workshop is demonstration and learning the principals of Tree development on Mountain cliffs and applying that philosophy in our demonstrating plant Ficus triangularis . It is also known as Ficus natalensis leprieurrii variegate.

Ficus natalensis leprieurrii variegate.
This plant is a tropical plant with variegated light green and with whitish yellow attractive leaves . The 
leaves  are in triangular shape. 


Trunk of the plant is vert stiff and cant bent. so a notch is made on the main trunk line where the main trunk going to have a hard bend. one of the branch removed raft tape is wrapped around the main trunk is wired and made a bend slowly

  
Among three branches one branch is removed and second main trunk is wrapped with raft tape and  wiring is done to that branch to bend it down in cascading manner just like how water flows down from mountains .

The entire link of making Cascade style Bonsai in below.


Once we done with wiring selection of pot is very important in cascade style.  Usually the pot for cascade style is heighted depth pot , so the free fall of the Bonsai plant can be seen clearly.
 we used Heighted pot for placement of the plant to show as if the plant is growing on Mountain top. and due to heavy rains ,winds and thonder storms plant developed down ward growth just like how water falls from mountains plants shape is  also happens to be like in that manner. Here I am sharing a plant in natural surroundings how it is growing in on hill top, Bonsai is nothing but we are creating natural styles in our plant
Below is traditional pot. Here heighted pot is traditional way of using for cascade style in Bonsai. Now Bonsai is a art, so Bonsai masters are using different pots. I will give you some example of of here.


Plant is in decorative pot


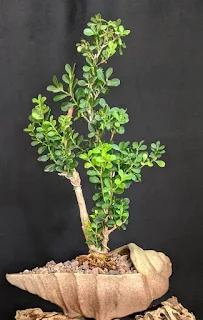
Cascade style in a half open shell like pot


Cascade style in a hand made pot


On a rock  and the plant fall is cascading


coming out of the rocks and the tree is growing down.

In Bonsai Art the Creation is infinite


May 27, 2021

Creating a Naturalistic Penjing with a Hand made Brick wall and Bonsai plant


Creating a Naturalistic Penjing with a Hand made Brick wall and Bonsai plant


Brick walls prepared for the use of Bonsai Land scape


Our Villages are having Beautiful Nature. Bonsai artists Natural Lovers. They are creating their Bonsais as natural as in Nature. This penjing is one of its creation. 

Material required

First Preparation wall is important. It is very simple. we need 
1) Cement and white cement 
2) Earthen cement color powder
3) Fine Sand
4) Plastic or Iron Mesh 
5) Brush, Trowel 


4) Wooden frame 


These are three different sizes of frames. It is better to make a wooden frame of your choice. then your wall will be of correct size and shape without any crooked edges.

Preparation of the Wall

One cup of cement
1/4 cup of sand
Color as required 
Mix them well and start adding water little by little and mix it properly


Take a plastic sheet and on it place a news paper and kept the frame on news paper .  Now a thin layer of cement to be filled by Trowel inside the frame. Spread it evenly as shown in video.


After Making a thin layer place the mesh of the wet cement, It helps to hold the Wall strong.


Now Again fill the Frame wit cement layer by layer with Trowel by spreading evenly, in between spray little dry cement powder on wet cement and spread it nicely.   


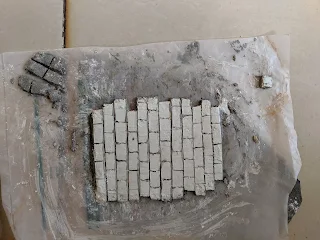
Make sure the thickness of the wall you want have , if it is more thick then wall becomes heavy,  so make medium thickness  and let it dry for 20 minutes. when the cement becoming a little dry draw straight lines with a knife or any wooden or metal stick so the lines will be of thin as shown in the photo.


After finished drawing the lines let the cement dry completely for a day water it next day.  Then check the cement. once it becomes dry take out the wooden frame, dry the wall completely. once it is ready our rectangular wall is ready.

Second method 

In this Method we removing the edges of the wall when it is still wet. 


This photo reminds us the aged wall structure. To get this when we finished cementing wait for 20 minutes and draw the lines. at that time select the edges of the wall which bricks you want to remove, Other wise remove randomly with a knife. Insert the knife in to wet cement and remove that piece carefully without damaging the wall. ow let the wall dry fully and and we can use for our landscape Bonsai styles.

How to make a white color Wall


If  we want to make a white wall dont mix any color in to cement use as it is and and after finishing making a wall when it is wet put white cement little by little on wet cement and spread well. After 20 minutes draw lines on white cement ad make it as a white wall, Now our white color Wall is ready . 


Four Different sizes of Bonsai walls are ready for our Penjing.


These are plain straight walls without any hole in middle. 
I will share the another post of white walls with a hole to place the plant with roots coming out of the wall.


May 12, 2021

Good and Best alternative for raft tape for bending Bonsai tree branches

Good and Best alternative for raft tape for bending Bonsai tree branches

Bonsai is Art of creating beautiful  Trees in shallow pots. when we are shaping or styling a plant it is necessary to bend branches. Some times  bending is very difficult if it is a thick branch. Because some times branch can be brake when we use lots of stress on branch, So to make it convenient to bend a branch without hurting, a rafting material is used to rap around the branches and on wrapping material wiring can be done . Then when we are bending the branch there wont be , damage to the branch because the rapping material is covered around the branch, only some  delicate cracks will be there which will  heal on its  own. This rapping tape is amiable on online. Other wise we can use insulation tape which is having much sticky substance. any eletrical insulation tape is also good. Another option is  Banana Plant stem will bw having some dried brown fiber like thin ribbon like patches will be coving the stem. They are Having Lots of fiber inside it, that is good for wrapping around the branches. Jute cloth also can be cut in to ribbons and can be used as wrapping tape. these are safe and good options for raft material. 

In this video construction tape is used to bend branches.


Here In this video jute thread Sutali is used instead of raft tape.


ART OF MAKING A BONSAI PLANT


ART OF MAKING A BONSAI PLANT

I am explaining the art Bonsai art through the photos for the beginners . It is a live art . With imagination one can create beautiful Bonsai.

This is a hard plant , it can be grown from the branches also. The plant has compact small leaves which is good for making Bonsai. Depending on height , bonsai plants are divided in to three sizes , one is Big Bonsai, second is Medium Bonsai, third is small Bonsai , it is also called as Mame Bonsai. First keep the plant in front of you and think for a while how to shape the plant.

Start wiring the plant branches with aluminium wire. Bend the Branches gently with two hands with one and placing underneath the branch, please don't harm the branch, one should be soft towards these plants and handle them just like small kids.

In detail you can check it on this below link

/ART-OF-MAKING-A-BONSAI-PLANT

https://bonsaiart.quora.com/ART-OF-MAKING-A-BONSAI-PLANT

Challenging Bonsai China Box Buxus

China Box is a good plant for any style of Bonsai. Long Back I bought a stone from a nursey.  Select a plant which is having attractive trunk line.

Plant is already having a good trunk line, nice branching. Thought of enhancing the beauty of the plant with placing  a behind the plant. 

Started searching a suitable rock . The structure of sand stone is matching with trunk line maturity.

Merging the rock and plant is a job of lots of creativity because the trunk and roots should be completely merged with rock . 


The roots are well developed and radiating in all directions giving a matured look to the plant.


Now we have to see the placement and position of the plant with the Rock. Check all sides of the rock and select one side that will be the front side and suitable for placing the plant. Now if we place plant as it is the plant and stone match with each other because the roots are covered with lots of soil. Some of the soil to be removed.   

Half of the soil is removed from down . So height of the plant is reduced to suit with the rock 


Now soil from back of the plant is also reduced
  

Some of the Soil from back side of the Plant is also reduced and placed near rock .


Merge the plant with rock , by removing back soil plant bought near the rock , so the trunk line of the plant perfectly fits with the groves of the rock.


pot is fitted with new soil


some wiring is done to give a shape to the plant


Video of Making a Rock Grown Bonsai. 


May 7, 2021

 Buxus microphylla is plant of  small leaves bushy plant. Its slow growing . Usually used for hedges and can be given a beautiful shape and challenging plant to grow as a Bonsai tree. Common nursery name of this plant is china box.

Making challenging Plant to a Bonsai is definitely a demanding  work for Bonsai lovers. Plant grows up to 6.5 feet tall. Branches are strong and needs little heavy gauge wire to bend. It is having a strong wood cambium. Good for making shari and Jin on the trunk line and branches. 

The most important point is this plant needs moist little alkane soil and grows well in shady place. Well drained soil is good for proper root growth. It prefers high dose of Nitrogen as fertilizer.

This is a nursery grown plant and is growing from branches. Buxus can be grown from seeds and branches.

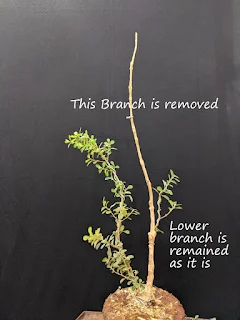
Here Buxus is having twin trunk . Main trunk long and thin. Most of the branches were removed ,only one branch is selected and given a shape by wiring.

Then the plant is kept in a shady place with good  nutritious soil which is required for the plant Buxus to have harmonious proper development.

After Six months Lower is kept and allowed to grow. Then top portion of the main trunk is removed.


This is proper development after one year. Buxus is having vigorous grow with many fresh new branches and green leaves. The fascinating curves of Buxus makes the plant more stylish with a unique pot. Bends of the second trunk are in harmony with the shape of the pot. 


Apr 29, 2021

Styling Thuja Orientalis ( Morpunkhi ) on A rock penjing


 Morpunki it is also called as Thuja orientalis and also called as Platycladus. This is a good Plant for Bonsai. Thuja is of plant  like cypress and ever green. In favorable conditions it can be grown as a indoor Bonsai, otherwise it is a little shade loving plant. it can be grow up to 10 to 12 feet. It is a slow growing medicinal plant. The leaves of the plant grown in flatten manner new leaves will have light fresh green color and old ones will be in dark green color. 

I bought a Thuja plant from a nursery and thought of making it in to a Bonsai. 

                                                             Plant Before Pruning  

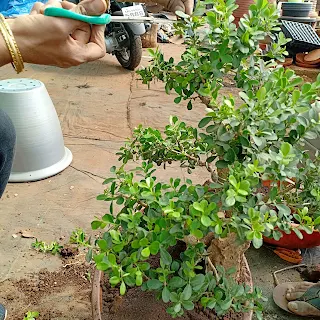
It is a nursery plant. just five years old. This plant is growing from branches, Thuja is slow growing plant with small tiny leaves. giving shape to this plant is little demanding job because of many small branches on the main trunk line. First we have to clean and clear the main trunk line by removing all small , tiny branches. then we get a clear view to wiring and styling of the plant. 
After some  cleaning we can see some space between branches and that gives a clear view for further steps of styling.
After Some pruning and cleaning


After Some wiring started styling Plant


By bending Morpunkhi , it was given a shape
After styling , its the time to repot the plant to a selected Bonsai pot. The pot and the plant should be synchronize and co exit in a natural way. 
This time instead of Pot a lawa stone is selected to place the plant as if it is growing from a mountain.
The Surface of stone is having good structure with small groves.


Select a best suitable place spot and angle on the rock to place the plant and make a grove by carving a notch to fit the plant in the rock.  


Plant will be place in this groove. 


Remove  some of soil and cut down the extra roots and place plant on the stone.


Click on this link for  Complete video of making