Bonsaikapilaas : #Классическаяцветочнаякомпозиция
='data:blog.title' itemprop='name'/>

pinterest

Showing posts with label #Классическаяцветочнаякомпозиция. Show all posts

Jun 21, 2020

Bonsai And Bonsai photoshoot . How to get best photo of your Bonsai.

Photographing A Bonsai : Once we finished shaping Bonsai Plant, we feel like capture the beauty of our creation in a frame. Here I am sharing some important points of Photography . These I learnt with experience, I would like to share with you all. We can start our photography shoot with our mobile. we don't need any expensive camera, Simple camera is also makes lots of difference. Then a normal simple tripod of for stable photos. For taking  good photos one need not to be a great photographer just follow some easy steps and your Bonsai photos will be marvelous. 
Back drop for photo shoot : First to show your Bonsai clearly with depth we should have a solid back ground with out any distractions. If you have plain wall that also makes a good back ground. Otherwise next step we can use Black or White colour or any other colour of plain cloth is makes a superior back ground.  when you selecting a cloth it should not be a shiny cloth, because it reflects the light.  
 
The cloth can be a velvet or 100% cotton cloth or Lekera cloth is gives a best back ground. Some times if your Bonsai is small then our coloured chart paper is perfect as a back drop. Back drop should be hang from a stand or with some support . please try to hang the cloth  straight down with out any folds.. The folds distracts the view of  main image. Our Bonsai plant can be placed in front of the backdrop on a table. We can put same cloth on table and place the plant on table. Then complete back ground will be full black and entire viewers concentration will be on Bonsai plant. Some times we can place turntable on the this table, that also gives a elegant look.

 In this photo table is covered with the same backdrop cloth

A turn table is place on the first table to place Bonsai plant

Chart paper also can be used as back drop in photography.


One more option is we can place glass sheet below Bonsai plant with black or white back drop, the reflection of the plant in the glass gives a beautiful look.


Here below we can see a detail view of White and Black drop . Both of them are good . according to our interest we can use any back ground. So always one back drop without any interruption is compulsory to show your beauty of the Bonsai  plant. 
 
To be continued in next posts with other tips like tripod placement and exposure etc.....


May 13, 2020

How to make beautiful bonsai pot Easily at home.


Bonsai is unlimited imagination to your creativity. I tried to create different pot for Premna plant.


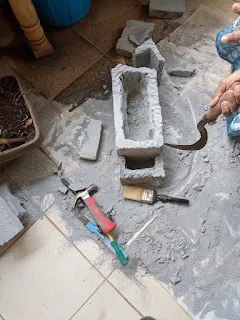
A beautiful cement block which is light and can be carved with a chisel, drilling machine, and hexa blade. here everything explained with photos. 
Tools required:


Cement Block before carving


                                                                  Started Carving with chisel,and drilling machine removed all the solid materiel from inside 


Drainage hole is also made at the bottom of the pot . 


and made some stone like carvings by knife and drilling machine 

If you want you can make drainage holes at the bottom of the pot.
And colors used are acrylic colors, not oil colors.


the final product is this. then it is colored with Fevicryl brown, black and yellow. First put the black color and on brown , then put yellow color
let the color dry out.
Bonsai is a Beautiful Art there is no limit to our creativity.

Then Nursery Plant Premna  is place inside the pot and soil is added. Now  it is looking as a old wood and the plant  coming up nicely. Any one can do this pot. Shaping premna plant. pruning and ramification will be done depending on the development of the plant just started.

Jun 18, 2017

Sequence Flower Bouquet

      Hand made Sequence Flowers

     This page can be translated into your mother tongue,

     click on translate button and write down your language

     it will automatically convert into your language


     These Flowers are made and kept a side, Step by step
      making of Flowers explained  step by step in previous
      posts 

      http://www.kapilaas.com/learn-hand-made-sequence-flowers.html


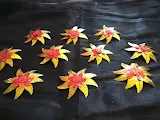
      Some more Flowers


      Bouquet making step by step


      Materials needed are One inch depth Rectangular 

      box, One Small Ganapathi or any other statue, 

      Floral sponge. For Ganapathi Mukut ( crown ).


     Cut the edge of the box as shown in the photo.

     Stick two boxes at an angle. Stick a lace to the 

     front side and sides of the box, so the front face

     looks attractive with lace.


     Floral sponge to kept with sellotape and it is 

     covered with netted cloth. And with glue gun 

     stick Ganapathi at the corner where cut 

     was made.


   Arranging flowers, first fill the back with long 

   stick flowers.


   Now We are using sequence flowers, the flowers

   are not having sticks , so we have to make one by 

   cutting cardboard 1/1 square pieces put glue on 

   it keep a stick at the back of  the flower and stick 

   card board at the back of the flower.


   Below is artistically arranged sequence flowers


   The speciality of this bouquet is Every thing is handmade

   and  it will be a #special , #unique , #classicgift .

   Finished Bouquet is ready to gift it to your loved ones.


     Flower making material is available with us, we can 

     ship to your address. Our face book page link is