Bonsaikapilaas : Bonsai
='data:blog.title' itemprop='name'/>

pinterest

Showing posts with label Bonsai. Show all posts

Mar 23, 2021

Which Bonsai soil is Having well drainage property

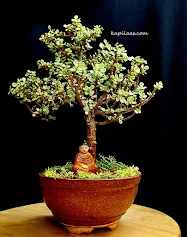
 A good Bonsai soil is the one which makes the plant grow healthy. Making  good Bonsai soil is very important for proper growth of the Bonsai plant. On line many different soil are available , but making one for your self saves money and gives satisfaction. not only that we can change the mixing ingredient preproteins in the soil depending on the species, like  coniferous plants wants some what different soil from the tropical  ficus varieties.

When we are making soil four main important points to be kept in Mine. 

First one is Soil should contain proper nutrients. 

Soil should  have good aeration for proper growth of the roots. When the roots are healthy plant will be healthy.

Soil should have proper moisture holding capacity to provide coolness to the roots to develop more fibrous or feeder roots ,these roots play a main role in suppling proper nutrients and  water to the entire plant for its right growth.

Main one is Soil should have proper drainage capacity so roots rotting reduces.

Keeping all these four points in mind a good Bonsai soil can be made.

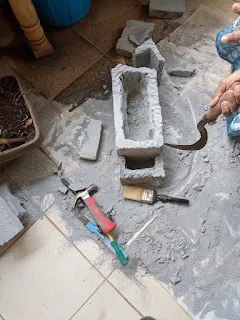
We will start with what is proper drainage for the plants once you water them. how to know about it.

Once you water the plant it should come out from drainage holes of thr bottom of the plot , water should not stay in the pot. If it is coming out that means soil is good, and aeration is good, drainage of the soil is proper.

Here  two videos are shared showing good drainage soil for the plant., please check them.


Here in this Video Drainage is not good, water is not coming out , Soil is taking lots of time to send the water down the soil.


 Here the soil is good and the drainage is proper for the Plant.
If the soil is not having proper drainage, we can increase drainage capacity by adding pumice stones they are in light weight and porous. so they can hold water.
Or We can add sand  
Or mulch can be added
Or perlite is also good material which is having water holding capacity.
Make a well drained soil and allow the plant to grow heathy , so plant get strength to fight against diseases.

Mar 15, 2021

How do you apply Liquid fertilizer to a Bonsai Plant

 Liquid fertilizer is essential for any flowering or fruiting tree because it contains micronutrients which plays a great role in plant development in fruiting and flowering stage.

When to give:

Liquid fertilizer or any fertilizer to be given in the morning before ten o clock or evening after five o clock to avoid sunburn of the leaves due to afternoon sunlight. and one more important thing is not to spray on a windy day.

What to do before giving fertilizer :

First give a nice shower to the plant to remove dust settled on the plant leaves.

How much to give:

There are many companies are producing organic and inorganic liquid fertilizers. First carefully read instructions before opening the fertilizer bottle. Take a sprayer and take right measurement of liquid fertilizer as written on the label and add accurate measurement of water. Mix it well. If you are doing it for the first time on any new plant you can take diluted quantity of liquid fertilizer add little more water.

How to Spray

This is also important stage of while spraying liquid fertilizer. Now start spraying on the leaves, below the leaves, and completely drench the plant. And can be spray it on the soil of the pot also. Or with a glass or mug you can add this water to the soil.

Frequency of fertilizer

Once in fortnight that means once in fifteen days you can spray it on the plant when the plant is in growing stage. Growing stage means that is spring.

To get more fruits and flowers

To get more fruits and flowers one can start giving liquid fertilizers from September month on wards till the end of spring season. In summer Be careful it the temperatures are going above 40 degrees centigrade. In rainy season one can stop giving liquid fertilizers.

Happy Growing

Liquid fertilizers always boost the plant’s development and makes the plant more resistance to diseases.

Mar 14, 2021

Re arranging and giving a new look to your Bonsai Plant

Bonsai is an Art your imagination runs for more and more creativity. You feel like adding more charm to your plant with decorative items like stones, houses, tiles, animals etc...

Here it is shown in a simple way how can you enhance your plant with your vision. first make your mind and have a clear idea how you are going to arrange them. then it will be easy for selection and quantity of the material we need.

Each step shown clearly in videos. first remove the top soil of the Bonsai plant and level the soil to place your tiles. these tiles are readily cut from a big piece with a tile cutting machine, they made in to small equal sizes, just like real tiles. 

Then select some tiles and arrange them around the plant. 


Arrangement of tiles is very important , it should not be monotonous. Select tiles of different sizes and some of same size. keep them a side. some times it need to cut the tile to accommodate the a selected place. arrange them in a manner as it looks so natural to give authentic look to the plant.


That the arrangement of the tiles should be like that all tiles in the same level just like a flat surface. For that with a wooden hammer just simply level them. if any tile is not in same level and if it if at lower level , just take out and fill with some soil and again place the tile. There will be gaps between the tiles fill the with fine soil which is sieved through fine sieve and spread this fine soil on the tiles. push the soil in between the tiles with a knife and put again more soil, By doing this the tiles will perfectly fit at their place.


To add greenery around the tiles place small, tiny leaves plants like sedum. They grow from branches also.

It spreads quickly and gives a green look just like lawn to our Bonsai plant. Place this plant cuttings around the tiles and clean the surface of the tiles with a brush. Water the plant. Now your Bonsai is having a new look. you will be amazed to see the change. 

            
There is a Lots of change between to photos. One is Before arrangement . Second is with displayed with a entirely different view adding  beauty to Our Bonsai plant.


Friends  entire placement of the stones  and arrangement is shown step by step in the video. watch this link to get more information.


Sep 9, 2020

How to crop a Bonsai photo to remove disterbing objects around our Bonsai plant.

When you are looking at a Bonsai photo, there should not be any disturbances around the Bonsai plant. when someone looking at the photo concentration should be on plant only. Distractions due to other objects lesson the main beauty of the plant. Here in cropping are using these software to a only if  necessary otherwise dont do any changes to the image.  We want real actual image of Bonsai as it is not a changed one.so use it limited.

Now we will see which software to use and how to use them. 

After taking the photo we can crop the photo by a software, so main attraction will be plant only.  For cropping image I am using Picasa soft ware . There crop the image and save the file, if you want add any addtional information you can write down by using text tool and save it. And second tool is fine tunning, By using this tool you can increase the shadow or you can lighten the image. Picasa is a simple software any one can use it. 

Second software is Adobe Photoshop. Here in this software we can we can expose all details of the plant. Its a sophisticated soft ware we need some experience to use this app. 

So Friends Take photographs and enjoy sharing with friends.

https://www.youtube.com/user/kapilaas

Jun 21, 2020

Bonsai And Bonsai photoshoot . How to get best photo of your Bonsai.

Photographing A Bonsai : Once we finished shaping Bonsai Plant, we feel like capture the beauty of our creation in a frame. Here I am sharing some important points of Photography . These I learnt with experience, I would like to share with you all. We can start our photography shoot with our mobile. we don't need any expensive camera, Simple camera is also makes lots of difference. Then a normal simple tripod of for stable photos. For taking  good photos one need not to be a great photographer just follow some easy steps and your Bonsai photos will be marvelous. 
Back drop for photo shoot : First to show your Bonsai clearly with depth we should have a solid back ground with out any distractions. If you have plain wall that also makes a good back ground. Otherwise next step we can use Black or White colour or any other colour of plain cloth is makes a superior back ground.  when you selecting a cloth it should not be a shiny cloth, because it reflects the light.  
 
The cloth can be a velvet or 100% cotton cloth or Lekera cloth is gives a best back ground. Some times if your Bonsai is small then our coloured chart paper is perfect as a back drop. Back drop should be hang from a stand or with some support . please try to hang the cloth  straight down with out any folds.. The folds distracts the view of  main image. Our Bonsai plant can be placed in front of the backdrop on a table. We can put same cloth on table and place the plant on table. Then complete back ground will be full black and entire viewers concentration will be on Bonsai plant. Some times we can place turntable on the this table, that also gives a elegant look.

 In this photo table is covered with the same backdrop cloth

A turn table is place on the first table to place Bonsai plant

Chart paper also can be used as back drop in photography.


One more option is we can place glass sheet below Bonsai plant with black or white back drop, the reflection of the plant in the glass gives a beautiful look.


Here below we can see a detail view of White and Black drop . Both of them are good . according to our interest we can use any back ground. So always one back drop without any interruption is compulsory to show your beauty of the Bonsai  plant. 
 
To be continued in next posts with other tips like tripod placement and exposure etc.....


May 13, 2020

How to make beautiful bonsai pot Easily at home.


Bonsai is unlimited imagination to your creativity. I tried to create different pot for Premna plant.


A beautiful cement block which is light and can be carved with a chisel, drilling machine, and hexa blade. here everything explained with photos. 
Tools required:


Cement Block before carving


                                                                  Started Carving with chisel,and drilling machine removed all the solid materiel from inside 


Drainage hole is also made at the bottom of the pot . 


and made some stone like carvings by knife and drilling machine 

If you want you can make drainage holes at the bottom of the pot.
And colors used are acrylic colors, not oil colors.


the final product is this. then it is colored with Fevicryl brown, black and yellow. First put the black color and on brown , then put yellow color
let the color dry out.
Bonsai is a Beautiful Art there is no limit to our creativity.

Then Nursery Plant Premna  is place inside the pot and soil is added. Now  it is looking as a old wood and the plant  coming up nicely. Any one can do this pot. Shaping premna plant. pruning and ramification will be done depending on the development of the plant just started.

Mar 16, 2020

Kokedama / Koke Bonsai Making Easy


Kokedama is a Bonsai holding a plant with moss ball, It is a variation of Bonsai in Japan. Its becoming very popular because of its beauty and low maintenance. Now Bonsai lovers are in love with Kokedama of Japan. its a old traditional art goes along with Ikebana, and Bonsai.
Kokedama is becoming hot gardening topic here I will show how to make kokedama moss ball..

Kokedama originated 30 years back a japanese word ne- rai, means root wash , which means no pot,  This art is also calles as koke - Bonsai. It is changes it style by wrapping with moss and became kokedama means moss Ball. Actually its a one of its kinds of Bonsai.
We can say kokedama as a Eco friendly way of growing plants, because here we are not using any pots.
Kokedama  can be made with out door, indoor, succulents, fruiting and flowering plants.its a beautiful  art for long lasting relationship with the plant and man. In kokedama one  can use  mixed display of plants  or single one according to your taste. The beauty of this Art is  diversified plants ranging from tropical to temperate , succulents to orchids can be selected according to your taste, weather and place.
Materials needed
Plants needed ,
Fern, Pine, PhilodendronSyngonium , Sansevieria , Maple, anthurium, dracaena, Fishbone Cactus, Asparagus, Fish Tail Fern, schefflera plant ,orchids, Anthurium, Caladium, African violet, succulents, Bromelaids, jade, Bamboo.etc...
Bonsai soil + Peat Moss
Keep Bonsai soil and  peat moss ready.
Sphagnum Moss
Sphagnum Moss is needed. keep Moss in water for ten minutes.
scissors 
Jute or Hemp , twine 
For tying the Moss ball. 


!) Keep Bonsai soil  with 15 % of peat moss and keep it ready ,Depending on the plant species we can change adding percentage of the peat moss.
2) Take out  plant from the pot and make Bonsai soil and peat moss little wet and press the soil around the root ball tightly , form a ball like structure around the root by pressing the soil tightly with both palms..


3) Now take wet moss and squeeze out water, put the moss around the soil ball and cover the soil completely with Moss and press out water a little, it will be  comfortable to tie the thread around the moss ball.


4) Take hemp and start tying around the moss ball a little tightly in a manner of 11 to 5 numbers in a clock., There are different styles of wrapping some times with two colored thread or single thread, what is comfortable for you, you can do it in that manner. If you are tying in a angular way in one direction that gives beautiful look to the moss ball. 


5) This kokedama can be made it as a hanging plant or you can keep it on a small stand also.


6) Watering depends on species of the plant that made it in to a Kokedama, and also on the season and also the zone where the plant is growing. If your plant is a succulent dip the moss ball in water for 15 to  20 minutes once in a week. It is advised to keep the plant away from scorching sun light.
8) Re potting once in two to three years depending on the root growth. Fertilizers to be used in the liquid form,


Learn More on Visiting Below link You tube Video

Kokedama Making Easy


Mar 29, 2019

A Correct Cut While shaping a Bonsai plant

Giving proper shape to a Bonsai plant is most important chapter in Bonsai Art. All Bonsai lovers will think of having a beautiful Bonsai. Beauty to comes to the plant through correct training and pruning methods. They have significant role in giving a pleasing look to a Bonsai plant.  
Training a Bonsai tree is giving a correct cut at correct place that is node of the plant where the leaf starts growing.  Knowing about  function of  the node is more important before making a cut on a Bonsai plant. All plants have nodes and inter nodes. Nodes and inter nodes are important parts of Plant Biology. Without nodes, the plant cannot develop leaves or branches. Even hardwood deciduous trees like Oaks, with life spans of more than 5000 years, and annuals and perennials of herbaceous plants, have nodes and inter nodes. 


Above photo shows nodes and Inter nodes of a plant. Here the space between two consecutive nodes  more. Most of the plants have long inter nodes, i.e, here in below picture the space between two consecutive nodes is clearly shown.
     
Plants of different species  have different inter nodal spaces. The Space between Two consecutive nodes that is between two leaves is very less in below photographs. These plant are having very less inter nodal space. 


  This photo shows long inter nodal space   
Where and how to cut a leaf at nodal point 

If the leaves are alternate cut is along with leaf angle                              


The angular cut above the leaf is helps to  prevent water damage  from stem and it heals fast so no disease. And cut looks natural.

If the leaves are opposite Cut will be in between leaves


Nodes are the important functional part of a plant where leaves, branches, flowers, fruits, and aerial roots originate on the stem. Nodes are responsible for proper propagation of the plant. 

Always New branches and flowers will rise from the node of the plant. Below first photo shows growing of a branch from the node above the leaf.

                                                                 Branch is growing from a node of leaf.

In Second photo it is clearly visible of growth of a flower from the node of a plant. There are Axillary buds at nodes of the leaf, they develop in to flowers and branches. 

These are the apical or terminal buds they are developing into flowers from base of apical node of leaf.

When pruning a Bonsai plant or any plant, a cut should  be made above the node, so regrowth of the plant will be proper.  In Bonsai, conventional method of cutting and pruning is always above the node of a leaf of a stem. 


To maintain height of a Bonsai plant remove the top bud (apical bud or tropical bud) , then the axillary buds becomes active and many new branches will develops from the leaf axil. Allow the new branches to develop 6 to eight pars of leaves, then remove the top bud of the branch, then there new branches will develop on the primary branch. The plant will have a compact growth with many branches .
                                                 

                            This video explains how to make cut above the leaf .


Inter node is the part or space between two consecutive nodes. Inter nodes carry water, hormones, nutrients from one node to the other.  Any cut made at inter nodal space make that portion of a stem to die back .


Here a wrong cut is happen above the node at inter nodal space ,usually if the cut is made like that, there are chances of die back of that portion will happen.
However, in some plants like dwarf conifers, evergreens, pinus taeda,Bald cypress,Norwey spruce,Thuja occidentalis,Yew, and Boxwood,inter nodes are shorter, which makes the leaves more dense. These plants can be made into ornamental shapes ( art of Topiary) by clipping or by pruning. These plants are also can be made in to Bonsai plants because of their shorter nodes,  they look so beautiful with dense foliage.

                            Leaves with shorter inter nodes         Pine plant under training
     
The response of Bonsai plant is very important after cutting and pruning. In some instances if proper cut is not made at right place there are chances of survival of the plant becomes less. My advice is to study the nature and species of the plant, and follow proper technique that is cut above the node to give a proper shape to the plant. To maintain height of a plant remove top most new buds or leaves of the main trunk line. Then side branches will stat growing. 

I tried to explain with some diagrams


On above photo, Apiary or terminal bud is removed on primary Branch. Now secondary branch is growing at the axil of the leaf node. then allow the second branch to grow , let it have some leaves , then one can remove terminal bud. 
This is the Ideal growth of a Plant, But in Nature ideal growth wont be possible always. Then Depending on  development of the branches one has to do cutting and pruning by understanding growth of a plant.  
Bonsai plants are replica of miniature form of  a tree growing in nature. Any time height of the Bonsai plant will remain small when compared to the huge trees.  Training a Bonsai plant is more like an art. 
In this century Bonsai is not only a gardening hobby  Now it is more in to Art.  Always Bonsai is artist's imagination and creativity which makes the Bonsai Tree Stand tall with its beauty among other plants.
Mr. Masahiko Kimura is a great Bonsai artist from japan, he is also called magician of Bonsai His creations are  just like painters brush stokes  which gives a wonderful look to Bonsai plants.  He revolutionized the Art of Bonsai from traditional way of training in to modern Contemporary Art.