Bonsaikapilaas : बोन्साई मिट्टी
='data:blog.title' itemprop='name'/>

pinterest

Showing posts with label बोन्साई मिट्टी. Show all posts

Jun 22, 2020

Bonsai And Bonsai photoshoot . How to get best photo of your Bonsai. Part 2

In last post we learnt every thing about the Back drop and its colors and how to use that.
Tripod setting for Photo shoot:
Tripod is an important instrument.in photography, if you place your camera on a tripod, , you can easily adjust shutter speed and time with out any jerks. Small jerk also makes your photo shaky without any clear, sharp picture. With Tripod we can adjust of the height the  camera with the same level of the plant with its position and angle. Fix  camera or mobile in tripod and adjust the height of tripod.


camera focus point and should match with pot level. The plant trunk base should and the camera eye will be in the same level. So plant will be visible as it is. we can get true image with out any Parallax error.


If you are looking at plant from an angle the picture you are getting wont be perfect , In out come photo the plant's image will be at an angle  and trunk line can be covered with branches. so its not proper way of getting a good picture.


In the above photograph the focus of camera is going above canopy of the plant. So in out come image of the plant the trunk line looks thin and  young.
camera Angle focus is from the Above the plant


Focus of camera in first photo it is on left side, and in second photo it is on right side  

The placement of tripod with camera and plant should be in 180 degrees line. If tripod is on right side or left side the image we are getting is not a actual image.
Tripod helps to take good photos when there is minimum light in the room, that time we need more shutter speed.  When  using camera with hand slight movement also reduces shutter speed, resulting in blur or grainy images.If camera is placed on tripod there wont be any  movement of the hand, On tripod minimum amount of movement resulting  best photos of Bonsai plants. If you dont have tripod there many home made tripod videos are there online, you can check them. you can make your own. The main use of tripod is stability for camera with least motion and best photo shoot..


To be continued in next posts with other tips like tripod placement and exposure etc.....

Jun 21, 2020

Bonsai And Bonsai photoshoot . How to get best photo of your Bonsai.

Photographing A Bonsai : Once we finished shaping Bonsai Plant, we feel like capture the beauty of our creation in a frame. Here I am sharing some important points of Photography . These I learnt with experience, I would like to share with you all. We can start our photography shoot with our mobile. we don't need any expensive camera, Simple camera is also makes lots of difference. Then a normal simple tripod of for stable photos. For taking  good photos one need not to be a great photographer just follow some easy steps and your Bonsai photos will be marvelous. 
Back drop for photo shoot : First to show your Bonsai clearly with depth we should have a solid back ground with out any distractions. If you have plain wall that also makes a good back ground. Otherwise next step we can use Black or White colour or any other colour of plain cloth is makes a superior back ground.  when you selecting a cloth it should not be a shiny cloth, because it reflects the light.  
 
The cloth can be a velvet or 100% cotton cloth or Lekera cloth is gives a best back ground. Some times if your Bonsai is small then our coloured chart paper is perfect as a back drop. Back drop should be hang from a stand or with some support . please try to hang the cloth  straight down with out any folds.. The folds distracts the view of  main image. Our Bonsai plant can be placed in front of the backdrop on a table. We can put same cloth on table and place the plant on table. Then complete back ground will be full black and entire viewers concentration will be on Bonsai plant. Some times we can place turntable on the this table, that also gives a elegant look.

 In this photo table is covered with the same backdrop cloth

A turn table is place on the first table to place Bonsai plant

Chart paper also can be used as back drop in photography.


One more option is we can place glass sheet below Bonsai plant with black or white back drop, the reflection of the plant in the glass gives a beautiful look.


Here below we can see a detail view of White and Black drop . Both of them are good . according to our interest we can use any back ground. So always one back drop without any interruption is compulsory to show your beauty of the Bonsai  plant. 
 
To be continued in next posts with other tips like tripod placement and exposure etc.....


May 13, 2020

How to make beautiful bonsai pot Easily at home.


Bonsai is unlimited imagination to your creativity. I tried to create different pot for Premna plant.


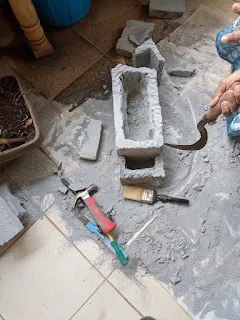
A beautiful cement block which is light and can be carved with a chisel, drilling machine, and hexa blade. here everything explained with photos. 
Tools required:


Cement Block before carving


                                                                  Started Carving with chisel,and drilling machine removed all the solid materiel from inside 


Drainage hole is also made at the bottom of the pot . 


and made some stone like carvings by knife and drilling machine 

If you want you can make drainage holes at the bottom of the pot.
And colors used are acrylic colors, not oil colors.


the final product is this. then it is colored with Fevicryl brown, black and yellow. First put the black color and on brown , then put yellow color
let the color dry out.
Bonsai is a Beautiful Art there is no limit to our creativity.

Then Nursery Plant Premna  is place inside the pot and soil is added. Now  it is looking as a old wood and the plant  coming up nicely. Any one can do this pot. Shaping premna plant. pruning and ramification will be done depending on the development of the plant just started.

May 3, 2020

How to make Ficus Green island plant on a rock


Dear Friends I am sharing development of Ficus green island plant and its long journey. the first and second photo was taken long back, that time we don't have any digital photography, it is a print out. This photo is taken in 1995. Actually the plant was bought in 1993 from a nursery. Then I kept in a rock. and allowed it to grow. During the growing period lots of changes takes place in plant trunk line started thickening and roots are coming out of  rock.

This is the First photo of the plant during 1995


This photo was taken on May 2nd 2020.


This is recent photo. some did ramification was done on plant and started removing all criss-cross roots and given a fresh look to the plant. After defoliation many new leaves are started growing and they are in smaller size when compared to last year leaves size. The Plant is having great time this summer and growing nicely.


 The below link shows howto defoliate leaves of Bonsai plant to reduce the size of the leaves

Dec 29, 2019

Roots Exposed Style in Bonsai

Root exposed style / Neagari style in Bonsai


In nature when soil erosion or cyclone takes place huge plants uprooted. Sometimes 50% of the roots will remain in ground, and the plants starts growing by giving new life to the tree. This type of trees is called as roots exposed style in Bonsai. Here this Ficus plant made in to a beautiful Root exposed style or Neagari style. Learn Bonsai in a natural way by creating essence of Nature.

How to make Roots exposed style

this image selected from google images

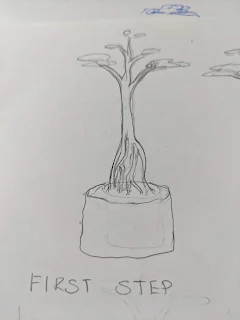
Nursery plant is made into root exposed style

Root exposed style is some portion of trunk line is replaced with roots which are exposed above the soil of the pot and give a strong and pleasing look to the plant.Most of the Ficus plants can be made into Root exposed style. In root exposed style selection of the plant depends on how strong the roots are and how long the roots. It is better to select a nursery plant which is root bound or pot bound plant.

Here we can see the plant  how strong the roots are, they are over grown and are coming out of the pot.
this type of roots will be strong and can give a plant a strong hold to stand on roots. Now remove the plastic bag with out disturbing the roots. 
Then carefully loosen the soil around the roots with a chopstick with out hurting roots.
Sometimes nursey plants will come with black or clay soil. Black or clay soil have the habit of extremely compact in nature. When it becomes dry soil contracts and there will be cracks in the soil. when the plant is coming with that type of soil keep the plant is a bucket of water for ten minutes and gently remove the soil around the
roots delicately with fingers.  Below  is the picture of plant kept in water for so time and soil is removed gently . The Best season for making root exposed style is during rainy season or just in early spring . that time plants root development will be more and plant will be in just growing stage. we did it in August month at the end of rainy season.
Below plant is also ficus species . Ficus plants they grow fast and they develop root system very fast and have sturdy roots, good for root exposed style. 


Below photo is Ficus variegata 

I selected Ficus variegata plant because of its variegated double colour  leaves which adds more beauty to Bonsai style. When I bought from nursery it is more than three feet tall and having long roots and they are coming out of the pot. Usually in Bonsai design depending on the trunk line thickness we decide the height of the plant. here the plant is having thin trunk line. So the height is reduced till the first branch , and the first branch is made as main trunk line .


Below picture shows clearly How the first branch is wired and merged with main trunk line. our group is having Monthly workshops. In one of our Bonsai Lovers Workshop root exposed style is demonstrated and members participated with great enthusiasm. 


After having a cutting , pruning and given a shape to the trunk line. Now we concentrated on root system ramification. Plant is removed from the garden plastic bag and gently soil is loosed with out disturbing the roots because for Root exposed style the main importance is root system.


Here in second picture we can see the roots clearly how strong and how long they are.
Now Roots are tied around a Bamboo stick to create some space space between the roots and tied with tape. Its gives a clear view of the roots and it adds beauty to the trunk line with out any crisscross roots. Instead of bamboo we can any place plastic pipe. I have chosen Bamboo because of its natural capacity of holding moisture which helps roots to have some moisture which gives coolness to the roots while growing. 

Second step placing the plant is a good garden soil 
Now the entire root ball with Bamboo to be placed in good soil for its further roots development. Take a plastic bag or pot , if it is a plastic bag, first make some drainage holes to allow the water to go out. Then fill lower portion of the bag / pot with with brick pieces or pumice stones for proper drainage. Fill one third of the bag with Bonsai soil and place the plant with Bamboo stick and top up with bonsai soil. the Bamboo stick should be immersed in soil completely.


Here is this picture we can see the entire root ball is inside the soil.


Now place the plant in a shady place for fifteen days where morning or evening sunlight is available. After  fifteen days slowly move the plant to a little sunny place, not in to direct sunlight. Because plant is is under stress of having repotting. if we keep the plant in direct sunlight evaporation of water from the leaves will be more and plants survival chances will be less.  Then after one month when the plant settles move it to direct sunlight. But ficus variegata can't tolerate afternoon heat of summer months. T that time Plant to be moved in to a shady place. Allow the plant grow and water it daily. Till one half year leave the plant like that , only do some cutting and pruning on branches to have a nice style.

After One and half year 

After one and half year remove the plastic bag. If it is a bag the removal of bag is easy , when compared to a pot. Gently remove it and open it loosen the soil. then carefully remove the bamboo stick.


 After Removing bamboo Plant is placed in a Bonsai pot.
We can see the development and plant is given a shape. 


This photo was taken June 2020 , recent one. Now the roots are strong and giving Bonsai plant sturdy look of Root Exposed style. The colour of leaves is a highlight to the plant.


Another way of making root exposed style of Bonsai 


Ficus benjamina is made in to Root exposed style in this method.


Another plant of Ficus made in to Root exposed style


Click on below link to watch

Friends Please do comment, Did get full information about root exposed style Bonsai. if you want more please let me know.
Bonsai