Bonsaikapilaas : #bonsaitree
='data:blog.title' itemprop='name'/>

pinterest

Showing posts with label #bonsaitree. Show all posts

May 7, 2021

 Buxus microphylla is plant of  small leaves bushy plant. Its slow growing . Usually used for hedges and can be given a beautiful shape and challenging plant to grow as a Bonsai tree. Common nursery name of this plant is china box.

Making challenging Plant to a Bonsai is definitely a demanding  work for Bonsai lovers. Plant grows up to 6.5 feet tall. Branches are strong and needs little heavy gauge wire to bend. It is having a strong wood cambium. Good for making shari and Jin on the trunk line and branches. 

The most important point is this plant needs moist little alkane soil and grows well in shady place. Well drained soil is good for proper root growth. It prefers high dose of Nitrogen as fertilizer.

This is a nursery grown plant and is growing from branches. Buxus can be grown from seeds and branches.

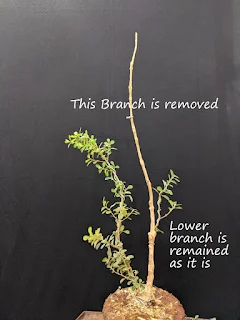
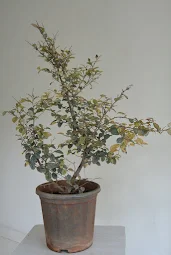
Here Buxus is having twin trunk . Main trunk long and thin. Most of the branches were removed ,only one branch is selected and given a shape by wiring.

Then the plant is kept in a shady place with good  nutritious soil which is required for the plant Buxus to have harmonious proper development.

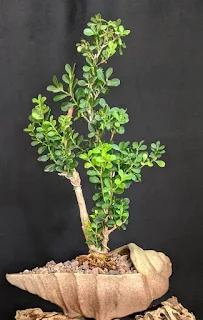
After Six months Lower is kept and allowed to grow. Then top portion of the main trunk is removed.


This is proper development after one year. Buxus is having vigorous grow with many fresh new branches and green leaves. The fascinating curves of Buxus makes the plant more stylish with a unique pot. Bends of the second trunk are in harmony with the shape of the pot. 


Apr 16, 2021

How to develop radiating roots on a peepal Bonsai.

Developing Radiating roots on mame /shohin Bonsai 
Peepal as Ficus religiosa is a tropical plant . It is a best loved Bonsai of Bonsai lovers. This plant can be made in to a Big Bonsai or small Bonsai. This plant can be grown from seeds,  branches, air layering also. It is a  deciduous tree sheds its leaves once in a year before spring season. Peepal tree canopy usually grows in umbrella shape giving shade to many animals and people during hot summer months. The life span of a peepal tree is more than 150 years. this tree considered to be largest oxygen provider.

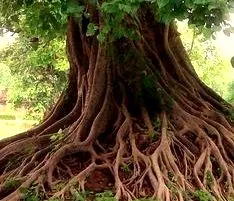
source is google image 

Here we can see clearly the development of Ficus religiosa tree roots. This is we can say radial development of  roots . it gives the tree a great  maturated and older look.
Bonsai is miniature form of a aged plant growing in Nature. Getting a matured look on Bonsai plants takes time, with patience we can develop our Bonsai plant as a Bonsai tree. 
Developing Radiating roots gives the plant a great look with good nebari. 
How to develop these roots is given in detail with photos and video. with patience we can develop these roots on our Bonsai peepal tree.

Peepal plant was already 5 years old. Height of the plant is three and half inches. It is already root bound and roots are coming out of the pot. Plant is taken out of the pot and long roots are reduced in length. leaving roots at the Base. 


              Bonsai Peepal is in Bonsai pot                            


                                  Most of the roots are reduced to fit the the plant in the pot.


One tile is selected and placed under the root base to make the roots to develop roots in all directions radially around the base of the trunk. By placing the tile the development of the roots will be in all directions. 


                                             Now the plant placed again in the Bonsai pot.
After six months again the repotting has taken is done.
Below photo is the roots are washed and the tile is again  placed back.


Again the plant is repotted in to the same Bonsai pot.

For more development of the roots Mame bonsai is placed in a big pot with soil. watering will be done regularly. The cool soil gives more moisture to Bonsai plant. makes more development of fibrous roots and root thickening takes place.
Video gives in detail step by step of  making


Mar 14, 2021

Re arranging and giving a new look to your Bonsai Plant

Bonsai is an Art your imagination runs for more and more creativity. You feel like adding more charm to your plant with decorative items like stones, houses, tiles, animals etc...

Here it is shown in a simple way how can you enhance your plant with your vision. first make your mind and have a clear idea how you are going to arrange them. then it will be easy for selection and quantity of the material we need.

Each step shown clearly in videos. first remove the top soil of the Bonsai plant and level the soil to place your tiles. these tiles are readily cut from a big piece with a tile cutting machine, they made in to small equal sizes, just like real tiles. 

Then select some tiles and arrange them around the plant. 


Arrangement of tiles is very important , it should not be monotonous. Select tiles of different sizes and some of same size. keep them a side. some times it need to cut the tile to accommodate the a selected place. arrange them in a manner as it looks so natural to give authentic look to the plant.


That the arrangement of the tiles should be like that all tiles in the same level just like a flat surface. For that with a wooden hammer just simply level them. if any tile is not in same level and if it if at lower level , just take out and fill with some soil and again place the tile. There will be gaps between the tiles fill the with fine soil which is sieved through fine sieve and spread this fine soil on the tiles. push the soil in between the tiles with a knife and put again more soil, By doing this the tiles will perfectly fit at their place.


To add greenery around the tiles place small, tiny leaves plants like sedum. They grow from branches also.

It spreads quickly and gives a green look just like lawn to our Bonsai plant. Place this plant cuttings around the tiles and clean the surface of the tiles with a brush. Water the plant. Now your Bonsai is having a new look. you will be amazed to see the change. 

            
There is a Lots of change between to photos. One is Before arrangement . Second is with displayed with a entirely different view adding  beauty to Our Bonsai plant.


Friends  entire placement of the stones  and arrangement is shown step by step in the video. watch this link to get more information.


Oct 9, 2020

How To Make Fringe flower in to Bonsai

 Fringe flower is also called as chemise fringe flower, Its scientific name is Loropetalum. it is also called as purple Dimond plant because of its purple leaves. it can be made in to Beautiful Bonsai. 

Main characters of the plant

Chinese fringe flower is a ornamental shrub grows up to  5to 6 feet. It can be pruned and can be given a shape. During the sunlight  a  chemical called anthocyanin is produced that gives a pleasant purple color to the leaves. The flowers of this plant will be hanging beautifully with pleasant pinkish purple color which highlights the plant when its in full bloom.


Sunlight

This plant grows well in full sunlight ,but the afternoon sunlight burns the leaves if the temperatures high and more than 35 degree centigrade, it prefers afternoon shade. Other wise plant grows well in full sunlight. Some of Bonsai artists  prefers as a indoor Bonsai by placing the plant on western direction window where you get full proper sunlight. If there no proper sunlight color of the leaves of the plant changes they wont be having that stunning bright purple colour, 

Soil

Loropetalum need good drainage ,organic soil for its proper growth. Fringe flowers likes acidic soil. To make soil acidic at least one third quantity peat moss to be added to your Bonsai soil. This plant needs lots of moisture in the soil , so peat moss helps to keep the moisture level constant.  here i will share my Bonsai soil ingredients .My Bonsai soil consist of three parts manure one part of garden soil, one part pumice stones of 1 to 2 mm . This is normally used for all my medium size Bonsai plants. 

Then for the plants like acidic soil loving plants I will add two parts of peat moss to Bonsai soil and mix them well. This is a good soil for loropetalum. 

Watering

The main and important point is while growing Fringe flowers the soil should be moist all the time. During summer months water the plant morning and evening, If the temperature is high keep the plant in shady place and give a shower to the plant. 

Care, Cutting and Pruning 

This plant responds well to cutting and pruning. perfect time for cutting is early spring. It starts flowering during spring. Usually the plants flowers two to three times a year , before winter, spring and during summer season. 


once the flowering season is over  cut and prune the branches and give a shape to the plant and make it ready for next flowering season by providing it with organic fertilizers and slow releasing fertilizes. This plant can be grown from branches also . that is the advantage we can make a branch cutting to rooting during late summer before rainy season.

The main important thing to keep Loropetalum healthy is give proper sunlight. too much afternoon sunlight or too much shade makes the plant to loose its bright purple color of leaves.


Then the plant  looses its vigor  and becomes weak , then there are chances of dyeing back of the plant. Too much sunlight burns leaves and there wont be proper flowering.


Take care of these then your Loropetalum will be a beautiful Bonsai of your collection.

Demonstration of  Loropetallum plant in to a Bonsai tree at Sinhgad College Students Council 


Jun 22, 2020

Bonsai And Bonsai photoshoot . How to get best photo of your Bonsai. Part 2

In last post we learnt every thing about the Back drop and its colors and how to use that.
Tripod setting for Photo shoot:
Tripod is an important instrument.in photography, if you place your camera on a tripod, , you can easily adjust shutter speed and time with out any jerks. Small jerk also makes your photo shaky without any clear, sharp picture. With Tripod we can adjust of the height the  camera with the same level of the plant with its position and angle. Fix  camera or mobile in tripod and adjust the height of tripod.


camera focus point and should match with pot level. The plant trunk base should and the camera eye will be in the same level. So plant will be visible as it is. we can get true image with out any Parallax error.


If you are looking at plant from an angle the picture you are getting wont be perfect , In out come photo the plant's image will be at an angle  and trunk line can be covered with branches. so its not proper way of getting a good picture.


In the above photograph the focus of camera is going above canopy of the plant. So in out come image of the plant the trunk line looks thin and  young.
camera Angle focus is from the Above the plant


Focus of camera in first photo it is on left side, and in second photo it is on right side  

The placement of tripod with camera and plant should be in 180 degrees line. If tripod is on right side or left side the image we are getting is not a actual image.
Tripod helps to take good photos when there is minimum light in the room, that time we need more shutter speed.  When  using camera with hand slight movement also reduces shutter speed, resulting in blur or grainy images.If camera is placed on tripod there wont be any  movement of the hand, On tripod minimum amount of movement resulting  best photos of Bonsai plants. If you dont have tripod there many home made tripod videos are there online, you can check them. you can make your own. The main use of tripod is stability for camera with least motion and best photo shoot..


To be continued in next posts with other tips like tripod placement and exposure etc.....

Jun 21, 2020

Bonsai And Bonsai photoshoot . How to get best photo of your Bonsai.

Photographing A Bonsai : Once we finished shaping Bonsai Plant, we feel like capture the beauty of our creation in a frame. Here I am sharing some important points of Photography . These I learnt with experience, I would like to share with you all. We can start our photography shoot with our mobile. we don't need any expensive camera, Simple camera is also makes lots of difference. Then a normal simple tripod of for stable photos. For taking  good photos one need not to be a great photographer just follow some easy steps and your Bonsai photos will be marvelous. 
Back drop for photo shoot : First to show your Bonsai clearly with depth we should have a solid back ground with out any distractions. If you have plain wall that also makes a good back ground. Otherwise next step we can use Black or White colour or any other colour of plain cloth is makes a superior back ground.  when you selecting a cloth it should not be a shiny cloth, because it reflects the light.  
 
The cloth can be a velvet or 100% cotton cloth or Lekera cloth is gives a best back ground. Some times if your Bonsai is small then our coloured chart paper is perfect as a back drop. Back drop should be hang from a stand or with some support . please try to hang the cloth  straight down with out any folds.. The folds distracts the view of  main image. Our Bonsai plant can be placed in front of the backdrop on a table. We can put same cloth on table and place the plant on table. Then complete back ground will be full black and entire viewers concentration will be on Bonsai plant. Some times we can place turntable on the this table, that also gives a elegant look.

 In this photo table is covered with the same backdrop cloth

A turn table is place on the first table to place Bonsai plant

Chart paper also can be used as back drop in photography.


One more option is we can place glass sheet below Bonsai plant with black or white back drop, the reflection of the plant in the glass gives a beautiful look.


Here below we can see a detail view of White and Black drop . Both of them are good . according to our interest we can use any back ground. So always one back drop without any interruption is compulsory to show your beauty of the Bonsai  plant. 
 
To be continued in next posts with other tips like tripod placement and exposure etc.....


May 26, 2020

How select a perfect gauge wire for Bonsai


Selection of proper wires for wiring  gives Bonsai plant a perfect look. Bonsai is an art of making Plants look like natural trees in shallow pots. To make it possible as natural as it is growing in Mother Nature we will some shaping and cutting, pruning and wiring. By Wiring we are giving a shape to the plant. The plant collected or brought from nursery or growing from seed will have primary branch,secondary branches
Bonsai masters use two types of wires. 
1) Anodized Aluminium wire
2) Anneal copper wire 
Both the wires good for shaping Bonsai plants
Anodized Aluminium wire is Aluminium is heated up to some temperature, by heating wire becomes movable , soft to make moves around the branch. 
Anneal copper wire heated to certain temperature and they cool it down to release stress inside the wire , otherwise copper wire will be brittle.
Now we will see how to select a wire.
Below link shows you before buying a aluminium or copper wire, how to text the wire is shown in detailed. 


Take one end of the wire  in to your hand and move around your finger , when you are doing it it should move freely around your finger just like a ring . it should not bend in 90 degrees angle. The smooth movement of wire around the branch makes the branch move any direction you want to give a style to the plant.
usually copper wire is used for wiring coniferous plants because, in coniferous plants the branch and leaf development is different from deciduous tropical plants. There in coniferous plants there are demonstrative and delicate bends for which copper wire is needed and also color matches with the trunk line of the coniferous plants. dont use any time naked copper wire , because when copper comes in contact with water oxide formation takes place and it there will be rusting on wire which can damage the trunk or branch of the plant.
One more wire is aluminium wire coated with copper or brown color is also available . it is inside aluminium and outer coating is brown color. 
For most of the tropical plants like ficus we are using aluminium wire. Aluminium gives a nice bend to the ficus plants.
we can use any wire depending on availability in your area. 
Below one more link of wiring will show in detail about wires and gauges. usually we use 1mm to 6 millimetre gauge wire for Bonsai. 1 to 2 mm is for thin young branches. for thick branches heavier gauge wire is used for drastic bending. it is difficult to measure at home the gauge of wire , So our great Bonsai masters given a the thumb rule is that when we are wiring one branch usually we take one third thickness of wire compared with that branch thickness, take the wire near the branch and see the thickness ,if wire thickness is one third we can use for bending the branch, 
One more easy method is just take the wire near the branch which you want to wire it and push the branch with wire, if wire is bending its not a proper gauge, if the branch is moving away with wire that is perfect gauge for wiring that branch. Some times we have only thin wire , we need not worry, take double strands of that wire and wire around the branch it gives strength and we can bent the branch.
wiring should be always in 45 degrees angle. how wire a plant we see it in next blog . 
now I will give one more link , it gives explains everything about wires.

May 22, 2020

Tamarind as a Bonsai tree

How to make tamarind as a bonsai.
Thank you friends for your comments and like for my Tamarind Bonsai plant.
Many Bonsai friends were asking for whats age of the plant and how to grow tamarind from a seed. which type of soil and watering. 
My Tamarind Bonsai plant is growing for more fifteen years,  Tamarind is a tropical plant. Growing tamarind Bonsai from a seed is easy, just soak tamarind seed in warm water over night and next day put seed in half soil and half coco peat mix. the seeds start germinating within two weeks, some times tamarind seeds fallen on the ground also develop in to plants in favorable conditions. At my place I can see many Tamarind plants growing from seeds. Once it starts germinating let it grow for two months and shift the plant in to a big pot with soil mix of garden soil, manure and three to four mm brick pieces ( without brick powder, remove brick powder by sieving) other wise it blocks drainage of the soil. instead of Brick pieces we can use pumice stones also. they are very light and porous.1:1:1. ratio. one soil, one manure and one pumice stones. Usually Tamarind is not choosy plant for soil, it can grow any type of soil, But if you want better and fast growth it is better to use well drained and manure soil. 
Let the plant grow in big pot at least for seven years, because when the plant is growing from seed it takes long time to start flowering , long time means more than 8 to 10 years.During this period wiring, pruning can be done to give a shape to Tamarind plant on regular basis.  Repoting I did once in a year up to 7 years, then the plant shifted to Bonsai pot. For the last two years it started flowering, Through this long journey plant it has seen many seasons. In autumns it looks very pretty with yellow leaves falling down.
This photo was taken in 2016 fall season


Then in spring plant gains energy and will with fresh green leaves. Once in two years re potting is done fresh soil and removing fine roots by making place for fresh energetic fiber roots. This year defoliation is done on May 15 , it took two full days to remove all leaves.

Tamarind Plant Before Defoliation

Ramification can be done after the plant grows extensively with whole long branches and green leaves.  Now Selection of branches  and giving a style to the plants is a key factor in designing a Bonsai plant. With Defoliating all the leaves will be removed so we can see through the plant clearly all the branches. So selection of branches for Pruning and wiring will comfortable and easy.


When the plant is young means 7 to 8 years .it needs lots of moisture in the soil for its proper growth. the soil should be moist but not wet. Once the plant matures let the soil dry in between watering  In summer once in a day, if the plant is open to full sun light and the temperatures are more than  38 digress centigrade two times of watering is necessary  and In winters once in day.
Regular fertilizing once in a month is necessary for healthy growth of the plant With NPK fertalizer. N is Nitrogen, P is for phosphorous and K is potassium. For flowering Plants P and K are more important for the plant for bearing fruits and flowers. During growing season it is better to  provide liquid spray of micro nutrients. 
Tamarind Plant From Branches / Vegetative growth.
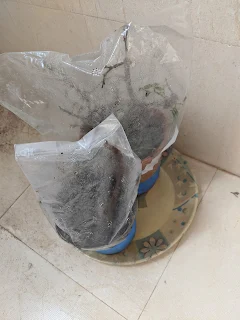
Tamarind plants can be grown from seeds and vegetative cuttings also.  For Vegetative growth take less than pencil thickness branch and apply root all hormone or cinnamon powder with honey apply near the cut and keep that branch in a pot with garden soil. cover the entire pot with plastic bag . so moisture will be there within one and half month these branches will have new fine roots. In second picture you can see moisture inside plastic bag.

                                                                                                                          
The plants grown from vegetative growth will start fruiting with in 6 years.
 Now I am trying to grow Tamarind Branches  in water . Take less than pencil thick branch and as soon as you cut it keep it is normal water. then take a glass  3/4 of water add root all hormone and place  plant cuttings in  the glass, every three days change water again add root all hormone. after one half month we can see roots and you can keep it in soil with equal portions of soil with coco peat. 


Tamarind is a leguminous tree, because it gives legumes . If you can take  proper care plant can survive more than 200 years. The Gnarled and twisted tamarind trees spread wide and give a beautiful as a bonsai tree. 


May 15, 2020

How and when to defoliate a Bonsai tree to reduce leaf size of Bonsai plant

Ficus Retusa Or Ficus Green Island Defoliation and Care


Spring and Autumn are  best Seasons  for plants growth, During this season plants will be active because of its favorable conditions of the weather lots of growth will be there. The movement  water, nutrients and food inside the plant will be vigorous,the plant will be  in active stage of developing new branches, leaves. Food preparation in the leaves that is photosynthesis  will be adding energy to the plant in thickening of trunk line. During this period if we defoliate plant by removing all the leaves at nodal point  there will be speedy new growth  because of this weather. 
In tropical countries defoliation can be done two times a year to reduce  size of the leaves. Mostly deciduous plants sheds  its leaves once in year. Defoliating means removing or cutting down the leaves of Bonsai plant. It is a regular practice of  Bonsai artists on their deciduous trees during the autumn season before spring. First we will see what are deciduous trees. Deciduous trees are usually Maple,oak mostly giant flowering trees around the region of equator. Most of these tropical plants they shed their leaves during Autumn season after their flowering season is over.  Leaves of  these plants are broad and the canopy of tree is round or umbrella shape. Ficus is tropical ever green tree with broad leaves. Ficus tree sheds their leaves to reduce the leaf foliage and evaporation of water during dry season to control water storage in the plant. As soon as monsoon returns new leaves starts developing.  Defoliation is a natural process  in nature. 
How to do Defoliation manually.
Always Leaf is attached to trunk with petiole. when leaf matures it changes its color to yellow because the leaf no more can prepare food for the plant. it can't do any photosynthesis activity. then slowly  leaf detaches from trunk or stem and falls down. but when manually doing cutting a leaf  from the stem we have to follow one procedure. Removing the leaf with a sharp  scissors leaving petiole on the stem. below it is explained with photos.                                            


There are different ways of doing defoliation depending on the Plant growth and health.

1) Complete Defoliating of the plant  
2) Partial outer canopy Defoliation POCD
3) One third leaf Defoliation
4) Removing only Big leaves Defoliation.

1) Complete Defoliating of the plant Complete defoliation is removing all the leaves on the plant. Complete defoliation some times we will also do it before wiring the plant, so we can see the branches of the plant clearly before pruning and ramification of the plant,
Below link shows how to do . 


Photos One is before defoliation, second is after Defoliation 


            2) Partial outer canopy Defoliation POCD 
In partial outer Canopy Defoliation means  removing only limited outer canopy by keeping inside leaves intact.

                    
                                                                                        Partial Outer Canopy Defoliation                        
                 3) One third leaf Defoliation
One third defoliation is shown below . Cut  one third of leaf leaving behind one fourth of leaf.  Cut all the leaves of the plant in same manner. One third defoliation we will to be done on a plant when the plant is young and the plant is not strong enough to take stress of complete defoliation.

                        4)  Removing only Big leaves Defoliation.                                                                              
Here we are not  touching young small leaves of the plant, we are removing only big leaves of the plant and allowing small leaves to to stay on plant, this type of  defoliation we will do on a planet when plant is not fully ready for complete defoliation and if it is effected with any pests.

Before removing  Big leaves                       
                                
 After removing Big leaves 
                                                                                           
Defoliation on deciduous plants encourages the plant to get more energy with new leaves and ready for it thickening the trunk line by giving more branches. Defoliation is a natural phenomenon on deciduous plants. When we are doing defoliation on Bonsai plants we have to remember some points. Ficus plants responds well for defoliation. Some ficus plant produce fruits. During fruiting stage don't defoliate Bonsai. it may harm the plant. check the health of the plant and do it.
Complete Defoliating of the plant should not
1) Be done on freshly re potted  plants.
2) When plant is infected with pests.
3) If the plant is weak without proper growth.
4) In hot summer months when temperature is above 35 degrees centigrade.
5) when the plant is young.
Care to be after Defoliation
1) Don't keep plant in full sunlight, keep it in semi shade.
2) Reduce watering after defoliation. Just keep the soil moist not wet.