Bonsaikapilaas : learn Bonsai
='data:blog.title' itemprop='name'/>

pinterest

Showing posts with label learn Bonsai. Show all posts

Jun 22, 2020

Bonsai And Bonsai photoshoot . How to get best photo of your Bonsai. Part 2

In last post we learnt every thing about the Back drop and its colors and how to use that.
Tripod setting for Photo shoot:
Tripod is an important instrument.in photography, if you place your camera on a tripod, , you can easily adjust shutter speed and time with out any jerks. Small jerk also makes your photo shaky without any clear, sharp picture. With Tripod we can adjust of the height the  camera with the same level of the plant with its position and angle. Fix  camera or mobile in tripod and adjust the height of tripod.


camera focus point and should match with pot level. The plant trunk base should and the camera eye will be in the same level. So plant will be visible as it is. we can get true image with out any Parallax error.


If you are looking at plant from an angle the picture you are getting wont be perfect , In out come photo the plant's image will be at an angle  and trunk line can be covered with branches. so its not proper way of getting a good picture.


In the above photograph the focus of camera is going above canopy of the plant. So in out come image of the plant the trunk line looks thin and  young.
camera Angle focus is from the Above the plant


Focus of camera in first photo it is on left side, and in second photo it is on right side  

The placement of tripod with camera and plant should be in 180 degrees line. If tripod is on right side or left side the image we are getting is not a actual image.
Tripod helps to take good photos when there is minimum light in the room, that time we need more shutter speed.  When  using camera with hand slight movement also reduces shutter speed, resulting in blur or grainy images.If camera is placed on tripod there wont be any  movement of the hand, On tripod minimum amount of movement resulting  best photos of Bonsai plants. If you dont have tripod there many home made tripod videos are there online, you can check them. you can make your own. The main use of tripod is stability for camera with least motion and best photo shoot..


To be continued in next posts with other tips like tripod placement and exposure etc.....

Jun 21, 2020

Bonsai And Bonsai photoshoot . How to get best photo of your Bonsai.

Photographing A Bonsai : Once we finished shaping Bonsai Plant, we feel like capture the beauty of our creation in a frame. Here I am sharing some important points of Photography . These I learnt with experience, I would like to share with you all. We can start our photography shoot with our mobile. we don't need any expensive camera, Simple camera is also makes lots of difference. Then a normal simple tripod of for stable photos. For taking  good photos one need not to be a great photographer just follow some easy steps and your Bonsai photos will be marvelous. 
Back drop for photo shoot : First to show your Bonsai clearly with depth we should have a solid back ground with out any distractions. If you have plain wall that also makes a good back ground. Otherwise next step we can use Black or White colour or any other colour of plain cloth is makes a superior back ground.  when you selecting a cloth it should not be a shiny cloth, because it reflects the light.  
 
The cloth can be a velvet or 100% cotton cloth or Lekera cloth is gives a best back ground. Some times if your Bonsai is small then our coloured chart paper is perfect as a back drop. Back drop should be hang from a stand or with some support . please try to hang the cloth  straight down with out any folds.. The folds distracts the view of  main image. Our Bonsai plant can be placed in front of the backdrop on a table. We can put same cloth on table and place the plant on table. Then complete back ground will be full black and entire viewers concentration will be on Bonsai plant. Some times we can place turntable on the this table, that also gives a elegant look.

 In this photo table is covered with the same backdrop cloth

A turn table is place on the first table to place Bonsai plant

Chart paper also can be used as back drop in photography.


One more option is we can place glass sheet below Bonsai plant with black or white back drop, the reflection of the plant in the glass gives a beautiful look.


Here below we can see a detail view of White and Black drop . Both of them are good . according to our interest we can use any back ground. So always one back drop without any interruption is compulsory to show your beauty of the Bonsai  plant. 
 
To be continued in next posts with other tips like tripod placement and exposure etc.....


May 13, 2020

How to make beautiful bonsai pot Easily at home.


Bonsai is unlimited imagination to your creativity. I tried to create different pot for Premna plant.


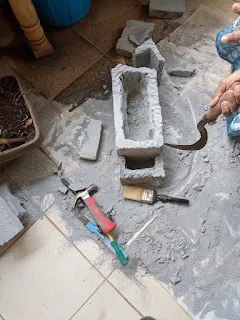
A beautiful cement block which is light and can be carved with a chisel, drilling machine, and hexa blade. here everything explained with photos. 
Tools required:


Cement Block before carving


                                                                  Started Carving with chisel,and drilling machine removed all the solid materiel from inside 


Drainage hole is also made at the bottom of the pot . 


and made some stone like carvings by knife and drilling machine 

If you want you can make drainage holes at the bottom of the pot.
And colors used are acrylic colors, not oil colors.


the final product is this. then it is colored with Fevicryl brown, black and yellow. First put the black color and on brown , then put yellow color
let the color dry out.
Bonsai is a Beautiful Art there is no limit to our creativity.

Then Nursery Plant Premna  is place inside the pot and soil is added. Now  it is looking as a old wood and the plant  coming up nicely. Any one can do this pot. Shaping premna plant. pruning and ramification will be done depending on the development of the plant just started.

Aug 17, 2019

How to make a Jin on Buxus Bonsai


JIN is the creation of Dead wood on a Bonsai tree. Usually when natural disaster like lighting or heavy winds or drought happens some of the branches dry off and it shows struggle for survive of the plant. Some of the branches dries off because of  natural calamity and entire branch will be died making that branch  as a Jinned branch. Jin gives a aged personality to the plant. Below is a photo of Naturally formed jin on a plant.

 
Here we would like to show beginners in detail step by step with videos How to make Jin on a Bonsai Plant. 
This Boxus Plant was chosen to make it in to Bonsai because of its trunk line structure and heaviness of the branches, after seeing its beauty thought of making one of the branches in to jin one of the branch selected and made into jin after removing the bark and branch was wired to give a curve shape, Other branches were also wired, given a shape to the plant. For almost One year plant is allowed to grow, only cutting and pruning was done, But due to heavy summer this year plant was effected and most of the branches were dried out. Felt so bad and shifted the plant to another place, it started growing again, but some of the branches dried out. then thought of making dried branches into jin. then the plant totally changed in to another beautiful style , I would like to share my Bonsai plant reformation with all my Bonsai friends.
During  workshop plant is given a shape.


For one year plant is kept at one place , then we shocked to see the dry branches on the plant. all most all the branches were dead , only main trunk line is healthy. taking the advantage of dry branches, started jinning . Jin and shari are dry branches on Bonsai. jinning is removing the bark of the branch and it will be given a shape. When bark of main trunk of Bonsai is removed is it called shari. Shari and Jin give a different matured look to Bonsai. Artistic creation of Jin and Shari makes the plant more aged look and it makes the Bonsai more beautiful. to make Jin we need some tools like sharp knife, jinning scissors , sand paper , concave cutter or knob cutter.


First clean the main trunk line of the plant and decision to be taken which branches are to be made into Jin. once you decide start removing the bark of the dried breaches. and branches are are exposed , one can see the smooth surface of the branch.

                                                                                                       
  Here main trunk line is cleaned by removing the unwanted branches. It gives a great look to the trunk line.


Clean the branch by removing dried secondary branches. then remove the bark with sharp knife.


Most of the branches were made into Jin branches


Plant is having good surface roots , some of the roots selected and other roots were trimmed down.


       Finished Bonsai with Jin                         Natural Jin formation on a tree
   
Then the plant is placed in Bonsai pot with having a new style.
Each step of jinning is expalined in the below link.

Making Jin Of Bonsai Plant explained step by step in the following Link
Jinning on Boxus Bonsai

Aug 15, 2019

How to make Nursery Plant into Bunjin / Literati style Bonsai

Literati / Bujin style of  trees can be seen in Nanga paintings. 

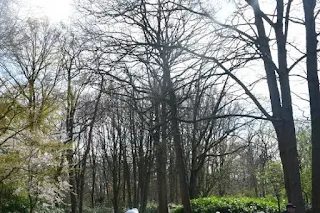
     Bunjin or Literati style is a unique style in nature. It is a beautiful form Nature. These types of trees we will find in dense forests. because of plants growing near to one another space between trees is reduced and, lack of sunlight makes the trees grow taller in search of light, that makes the plant taller and taller and only the top portion branches. Main trunk line movement will depend on the space available between the trees. As the tree grows towards sunlight the older branches of the trunk line die because of less scope for further growth and dense trees blocks sunlight. Nature gives the tree a magnificent look with many elegant curves. Below image shows growth of trees in dense forests.


Some trees growing on hilly area  and on mountains represent Literati style. 

                      Some native trees growing on Hilly area are also look like Bunjin style because of effect of extreme weather, like drought, high temperature which makes the tree survival of the fittest. Nature gives the tree a graceful look with forceful curves and twists. Main trunk line which is affected with drastic   changes of nature will be dried and gives the tree a stunning look with open trunk line.      

                      Literati style is like a poem written by literate or scholar in which first line of the poem is beautiful , second is more beautiful,third is most beautiful, last line of the poem is extremely beautiful, means each curve of the tree is beautiful, as it is twisted and goes up beauty of the tree increases with more twists, gives the tree graceful and artistic style called as Bunjin  or Literati style.  
    
The main character of Literati style three thirds of the tree will not be having any greenery or branches. Most of the trunk like will have shari. Shari is removing the bark of the tree on one side to show as is the tree is exposed to extreme conditions of the weather on high mountains. Branches on the main trunk line will be removed, or otherwise they will be made in to jin. Jin is removing bark of the branch on one side. the main trunk line will be wrapped with wrapping tape, this tape protects the bark while twisting the trunk line. Any small split or breaks formed on trunk line while twisting is protected by the tape and will heal on its own. Then wiring on the trunk line will be done. Then slowly trunk will be twisted and given a shape in to Literati style. How to Make Shari and Jin will be shown in coming blogs.

            
                   Before Making in to Bonsai                                Literati / Bunjin style 

                                         Other Bonsais of Bunjin style are shown here.


Here is the link to watch Video

How to make Bonsai Literati style step by step for bonsai beginners explained


Mar 29, 2019

A Correct Cut While shaping a Bonsai plant

Giving proper shape to a Bonsai plant is most important chapter in Bonsai Art. All Bonsai lovers will think of having a beautiful Bonsai. Beauty to comes to the plant through correct training and pruning methods. They have significant role in giving a pleasing look to a Bonsai plant.  
Training a Bonsai tree is giving a correct cut at correct place that is node of the plant where the leaf starts growing.  Knowing about  function of  the node is more important before making a cut on a Bonsai plant. All plants have nodes and inter nodes. Nodes and inter nodes are important parts of Plant Biology. Without nodes, the plant cannot develop leaves or branches. Even hardwood deciduous trees like Oaks, with life spans of more than 5000 years, and annuals and perennials of herbaceous plants, have nodes and inter nodes. 


Above photo shows nodes and Inter nodes of a plant. Here the space between two consecutive nodes  more. Most of the plants have long inter nodes, i.e, here in below picture the space between two consecutive nodes is clearly shown.
     
Plants of different species  have different inter nodal spaces. The Space between Two consecutive nodes that is between two leaves is very less in below photographs. These plant are having very less inter nodal space. 


  This photo shows long inter nodal space   
Where and how to cut a leaf at nodal point 

If the leaves are alternate cut is along with leaf angle                              


The angular cut above the leaf is helps to  prevent water damage  from stem and it heals fast so no disease. And cut looks natural.

If the leaves are opposite Cut will be in between leaves


Nodes are the important functional part of a plant where leaves, branches, flowers, fruits, and aerial roots originate on the stem. Nodes are responsible for proper propagation of the plant. 

Always New branches and flowers will rise from the node of the plant. Below first photo shows growing of a branch from the node above the leaf.

                                                                 Branch is growing from a node of leaf.

In Second photo it is clearly visible of growth of a flower from the node of a plant. There are Axillary buds at nodes of the leaf, they develop in to flowers and branches. 

These are the apical or terminal buds they are developing into flowers from base of apical node of leaf.

When pruning a Bonsai plant or any plant, a cut should  be made above the node, so regrowth of the plant will be proper.  In Bonsai, conventional method of cutting and pruning is always above the node of a leaf of a stem. 


To maintain height of a Bonsai plant remove the top bud (apical bud or tropical bud) , then the axillary buds becomes active and many new branches will develops from the leaf axil. Allow the new branches to develop 6 to eight pars of leaves, then remove the top bud of the branch, then there new branches will develop on the primary branch. The plant will have a compact growth with many branches .
                                                 

                            This video explains how to make cut above the leaf .


Inter node is the part or space between two consecutive nodes. Inter nodes carry water, hormones, nutrients from one node to the other.  Any cut made at inter nodal space make that portion of a stem to die back .


Here a wrong cut is happen above the node at inter nodal space ,usually if the cut is made like that, there are chances of die back of that portion will happen.
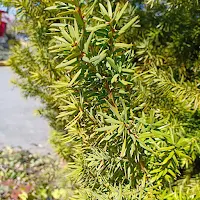
However, in some plants like dwarf conifers, evergreens, pinus taeda,Bald cypress,Norwey spruce,Thuja occidentalis,Yew, and Boxwood,inter nodes are shorter, which makes the leaves more dense. These plants can be made into ornamental shapes ( art of Topiary) by clipping or by pruning. These plants are also can be made in to Bonsai plants because of their shorter nodes,  they look so beautiful with dense foliage.

                            Leaves with shorter inter nodes         Pine plant under training
     
The response of Bonsai plant is very important after cutting and pruning. In some instances if proper cut is not made at right place there are chances of survival of the plant becomes less. My advice is to study the nature and species of the plant, and follow proper technique that is cut above the node to give a proper shape to the plant. To maintain height of a plant remove top most new buds or leaves of the main trunk line. Then side branches will stat growing. 

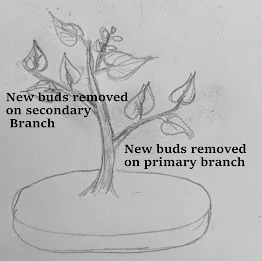
I tried to explain with some diagrams


On above photo, Apiary or terminal bud is removed on primary Branch. Now secondary branch is growing at the axil of the leaf node. then allow the second branch to grow , let it have some leaves , then one can remove terminal bud. 
This is the Ideal growth of a Plant, But in Nature ideal growth wont be possible always. Then Depending on  development of the branches one has to do cutting and pruning by understanding growth of a plant.  
Bonsai plants are replica of miniature form of  a tree growing in nature. Any time height of the Bonsai plant will remain small when compared to the huge trees.  Training a Bonsai plant is more like an art. 
In this century Bonsai is not only a gardening hobby  Now it is more in to Art.  Always Bonsai is artist's imagination and creativity which makes the Bonsai Tree Stand tall with its beauty among other plants.
Mr. Masahiko Kimura is a great Bonsai artist from japan, he is also called magician of Bonsai His creations are  just like painters brush stokes  which gives a wonderful look to Bonsai plants.  He revolutionized the Art of Bonsai from traditional way of training in to modern Contemporary Art.