Bonsaikapilaas : Bonsai from nursery plant.
='data:blog.title' itemprop='name'/>

pinterest

Showing posts with label Bonsai from nursery plant.. Show all posts

Jun 22, 2020

Bonsai And Bonsai photoshoot . How to get best photo of your Bonsai. Part 2

In last post we learnt every thing about the Back drop and its colors and how to use that.
Tripod setting for Photo shoot:
Tripod is an important instrument.in photography, if you place your camera on a tripod, , you can easily adjust shutter speed and time with out any jerks. Small jerk also makes your photo shaky without any clear, sharp picture. With Tripod we can adjust of the height the  camera with the same level of the plant with its position and angle. Fix  camera or mobile in tripod and adjust the height of tripod.


camera focus point and should match with pot level. The plant trunk base should and the camera eye will be in the same level. So plant will be visible as it is. we can get true image with out any Parallax error.


If you are looking at plant from an angle the picture you are getting wont be perfect , In out come photo the plant's image will be at an angle  and trunk line can be covered with branches. so its not proper way of getting a good picture.


In the above photograph the focus of camera is going above canopy of the plant. So in out come image of the plant the trunk line looks thin and  young.
camera Angle focus is from the Above the plant


Focus of camera in first photo it is on left side, and in second photo it is on right side  

The placement of tripod with camera and plant should be in 180 degrees line. If tripod is on right side or left side the image we are getting is not a actual image.
Tripod helps to take good photos when there is minimum light in the room, that time we need more shutter speed.  When  using camera with hand slight movement also reduces shutter speed, resulting in blur or grainy images.If camera is placed on tripod there wont be any  movement of the hand, On tripod minimum amount of movement resulting  best photos of Bonsai plants. If you dont have tripod there many home made tripod videos are there online, you can check them. you can make your own. The main use of tripod is stability for camera with least motion and best photo shoot..


To be continued in next posts with other tips like tripod placement and exposure etc.....

Jun 21, 2020

Bonsai And Bonsai photoshoot . How to get best photo of your Bonsai.

Photographing A Bonsai : Once we finished shaping Bonsai Plant, we feel like capture the beauty of our creation in a frame. Here I am sharing some important points of Photography . These I learnt with experience, I would like to share with you all. We can start our photography shoot with our mobile. we don't need any expensive camera, Simple camera is also makes lots of difference. Then a normal simple tripod of for stable photos. For taking  good photos one need not to be a great photographer just follow some easy steps and your Bonsai photos will be marvelous. 
Back drop for photo shoot : First to show your Bonsai clearly with depth we should have a solid back ground with out any distractions. If you have plain wall that also makes a good back ground. Otherwise next step we can use Black or White colour or any other colour of plain cloth is makes a superior back ground.  when you selecting a cloth it should not be a shiny cloth, because it reflects the light.  
 
The cloth can be a velvet or 100% cotton cloth or Lekera cloth is gives a best back ground. Some times if your Bonsai is small then our coloured chart paper is perfect as a back drop. Back drop should be hang from a stand or with some support . please try to hang the cloth  straight down with out any folds.. The folds distracts the view of  main image. Our Bonsai plant can be placed in front of the backdrop on a table. We can put same cloth on table and place the plant on table. Then complete back ground will be full black and entire viewers concentration will be on Bonsai plant. Some times we can place turntable on the this table, that also gives a elegant look.

 In this photo table is covered with the same backdrop cloth

A turn table is place on the first table to place Bonsai plant

Chart paper also can be used as back drop in photography.


One more option is we can place glass sheet below Bonsai plant with black or white back drop, the reflection of the plant in the glass gives a beautiful look.


Here below we can see a detail view of White and Black drop . Both of them are good . according to our interest we can use any back ground. So always one back drop without any interruption is compulsory to show your beauty of the Bonsai  plant. 
 
To be continued in next posts with other tips like tripod placement and exposure etc.....


May 13, 2020

How to make beautiful bonsai pot Easily at home.


Bonsai is unlimited imagination to your creativity. I tried to create different pot for Premna plant.


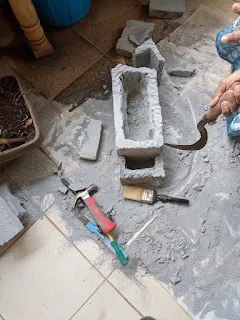
A beautiful cement block which is light and can be carved with a chisel, drilling machine, and hexa blade. here everything explained with photos. 
Tools required:


Cement Block before carving


                                                                  Started Carving with chisel,and drilling machine removed all the solid materiel from inside 


Drainage hole is also made at the bottom of the pot . 


and made some stone like carvings by knife and drilling machine 

If you want you can make drainage holes at the bottom of the pot.
And colors used are acrylic colors, not oil colors.


the final product is this. then it is colored with Fevicryl brown, black and yellow. First put the black color and on brown , then put yellow color
let the color dry out.
Bonsai is a Beautiful Art there is no limit to our creativity.

Then Nursery Plant Premna  is place inside the pot and soil is added. Now  it is looking as a old wood and the plant  coming up nicely. Any one can do this pot. Shaping premna plant. pruning and ramification will be done depending on the development of the plant just started.

Aug 31, 2019

Peepal Tree as Bonsai


Peepal is called as ASHWATHA in sanskrit. It can be also called as Pippala, peepal peepul.It is considered as a holy tree. This is a native tree of India, held sacred by the Buddhists, who believe that Gautama Buddha received enlightenment under a Bo tree at Bodh Gaya. The botanical classification of this tree is:Family:  Moraceae.
Scientific name is- Ficus religiosa.


Aswatha is a fast-growing species. It is a large deciduous tree. In about 50 years it matures to a height of about 15 meters, with  
dense umbrella like crown about 10 to 15 m in spread. Peepal grows profusely and abundantly in and around any openings, inhabited plots, and grow as an epiphyte on other trees and then when the host-tree dies, they establish on the soil. The bark of peepal is grayish white in colour. The bark secretes a kind of milk like latex which dries into a kind of jelly having considerable medical utility. In fact, all parts of the tree have medicinal value.
The leaves of peepal are alternate, orbicular to ovate, like pan leaves. These are reddish when young. Subsequently these are somewhat coriaceous, shining above and dull green below, they hang from long, flexible petioles and rustle in the slightest breeze. Individual leaf is about 10 to 15 cm in diameter. The species sheds its leaves during autumn. New leaves sprout in February-March. Peepal bears small dark purple hardly visible flowers during February-March. The fruit is purple in colour, globule in shape and nearly 4 to 5 mm in diameter, appear during March-April. These are sweet in taste.
However, peepal seedlings can be raised from seed. and also the cuttings in well-worked soil can propagate the species. Peepal trees are wonderful and very versatile plants, beautiful to look at during any season of the year. Tolerating a wide range of soil conditions and a certain degree of drought, Peepal trees add permanence to the garden landscape as they maintain their foliage color throughout summer and winter. Foliage color change within the same plant vary a little, depending upon season.
In general, peepal are the trees which are easy to grow. Usually they should be grown in free-draining soil, and do well in poor or impoverished soils. They do not like boggy or water-logged soils.  Their native habitats are often rocky or mountainous in nature, and they look particularly good in such settings in a garden

They can be grown well from the cuttings of 5 to 6 cm in length in mixture sand and peat. They generally enjoy full sun and good drainage. During summer droughts they withstand heat and dry conditions much better than other plants. 
These plants give compact new growth with regular pinching of the new leaves once in three months and this encourages the plant a bushy growth. Repotting should be done during growing season preferably every second year for a full-grown plant or when the pot is root bound. After the repotting, don’t allow the soil to completely dry. And one more important thing is that, keep the plant in shade, or in semi shade at least for one month. Regular Watering is important, and allow the soil to dry out completely in between watering.
Regular fertilizing makes the plant look beautiful. Spray the foliage at once in a month with liquid fertilizers, generally neem based. Fertilize the soil once in a month with sufala or bone meal in very little quantities just like half a tea spoon. Before fertilizing the plants wet the plant fully and put the fertilizer in the soil and again water the soil a little bit. Regular spraying of fertilizes keeps the plant hale and healthy.

Aug 17, 2019

How to make a Jin on Buxus Bonsai


JIN is the creation of Dead wood on a Bonsai tree. Usually when natural disaster like lighting or heavy winds or drought happens some of the branches dry off and it shows struggle for survive of the plant. Some of the branches dries off because of  natural calamity and entire branch will be died making that branch  as a Jinned branch. Jin gives a aged personality to the plant. Below is a photo of Naturally formed jin on a plant.

 
Here we would like to show beginners in detail step by step with videos How to make Jin on a Bonsai Plant. 
This Boxus Plant was chosen to make it in to Bonsai because of its trunk line structure and heaviness of the branches, after seeing its beauty thought of making one of the branches in to jin one of the branch selected and made into jin after removing the bark and branch was wired to give a curve shape, Other branches were also wired, given a shape to the plant. For almost One year plant is allowed to grow, only cutting and pruning was done, But due to heavy summer this year plant was effected and most of the branches were dried out. Felt so bad and shifted the plant to another place, it started growing again, but some of the branches dried out. then thought of making dried branches into jin. then the plant totally changed in to another beautiful style , I would like to share my Bonsai plant reformation with all my Bonsai friends.
During  workshop plant is given a shape.


For one year plant is kept at one place , then we shocked to see the dry branches on the plant. all most all the branches were dead , only main trunk line is healthy. taking the advantage of dry branches, started jinning . Jin and shari are dry branches on Bonsai. jinning is removing the bark of the branch and it will be given a shape. When bark of main trunk of Bonsai is removed is it called shari. Shari and Jin give a different matured look to Bonsai. Artistic creation of Jin and Shari makes the plant more aged look and it makes the Bonsai more beautiful. to make Jin we need some tools like sharp knife, jinning scissors , sand paper , concave cutter or knob cutter.


First clean the main trunk line of the plant and decision to be taken which branches are to be made into Jin. once you decide start removing the bark of the dried breaches. and branches are are exposed , one can see the smooth surface of the branch.

                                                                                                       
  Here main trunk line is cleaned by removing the unwanted branches. It gives a great look to the trunk line.


Clean the branch by removing dried secondary branches. then remove the bark with sharp knife.


Most of the branches were made into Jin branches


Plant is having good surface roots , some of the roots selected and other roots were trimmed down.


       Finished Bonsai with Jin                         Natural Jin formation on a tree
   
Then the plant is placed in Bonsai pot with having a new style.
Each step of jinning is expalined in the below link.

Making Jin Of Bonsai Plant explained step by step in the following Link
Jinning on Boxus Bonsai