Premna Is a good plant bonsai. Regular cutting and pruning makes the plant a Bonsai.
Showing posts with label #bonsaifromcuttings. Show all posts
Showing posts with label #bonsaifromcuttings. Show all posts
Jun 18, 2021
Making Ashoka tree as Bonsai
Making Ashoka tree as Bonsai
Ashokais a beautiful plant to make it in to Bonsai. I am training the plant for the last eight years, there is a lots of development in the plant . It is taking a Beautiful Bonsai style.


Photo is of eight years Back

Allowed to grow wildly for two years and given a shape by cutting and pruning.

Plant is having a good trunk like and having a good look.
May 16, 2021
Ficus rumphi Bonsai on a Rock
Ficus Rumphi on a Rock

Ficus rumphi Bonsai on a Rock
This is a variety of Ficus rumphi plant. This is a variety of ficus. This plant is also called as Bodhi Vrush. There is a little difference between leaf of Ficus religiosa and ficus rumphi. Ficus religiosa that is peepal tree leaves tip is long and sharp, while ficus rumphi leaves tip is short and sharp. There are many medicinal uses are there with the latex of this plant.
Ficus rumphi can be grown from seeds, branches and air layering. its a tropical plant and favorite plant Bonsai lovers because of its trunk line structure, umbrella shape of canopy and matured radiating roots development of the plant. its a fast growing tree. Responds well to cutting and pruning by developing more branches from its nodes.

Ficus plant is placed on rock and looking for a correct position on the rock

The placement of plant on a rock should be as natural as it is growing on the rock

After fixing it tie the plant to rock with any tape so plant wont move. Then there will be proper growth of the plant, Roots will hold the rock slowly as they start growing.

This is the fresh placement and positioning on rock . I will share the growth of the plant on coming chapters.
For a complete video I am sharing the link. Please check it.
May 12, 2021
Good and Best alternative for raft tape for bending Bonsai tree branches
Good and Best alternative for raft tape for bending Bonsai tree branches
Bonsai is Art of creating beautiful Trees in shallow pots. when we are shaping or styling a plant it is necessary to bend branches. Some times bending is very difficult if it is a thick branch. Because some times branch can be brake when we use lots of stress on branch, So to make it convenient to bend a branch without hurting, a rafting material is used to rap around the branches and on wrapping material wiring can be done . Then when we are bending the branch there wont be , damage to the branch because the rapping material is covered around the branch, only some delicate cracks will be there which will heal on its own. This rapping tape is amiable on online. Other wise we can use insulation tape which is having much sticky substance. any eletrical insulation tape is also good. Another option is Banana Plant stem will bw having some dried brown fiber like thin ribbon like patches will be coving the stem. They are Having Lots of fiber inside it, that is good for wrapping around the branches. Jute cloth also can be cut in to ribbons and can be used as wrapping tape. these are safe and good options for raft material.
In this video construction tape is used to bend branches.
Here In this video jute thread Sutali is used instead of raft tape.
May 7, 2021
Buxus microphylla is plant of small leaves bushy plant. Its slow growing . Usually used for hedges and can be given a beautiful shape and challenging plant to grow as a Bonsai tree. Common nursery name of this plant is china box.
Making challenging Plant to a Bonsai is definitely a demanding work for Bonsai lovers. Plant grows up to 6.5 feet tall. Branches are strong and needs little heavy gauge wire to bend. It is having a strong wood cambium. Good for making shari and Jin on the trunk line and branches.
The most important point is this plant needs moist little alkane soil and grows well in shady place. Well drained soil is good for proper root growth. It prefers high dose of Nitrogen as fertilizer.
This is a nursery grown plant and is growing from branches. Buxus can be grown from seeds and branches.
Here Buxus is having twin trunk . Main trunk long and thin. Most of the branches were removed ,only one branch is selected and given a shape by wiring.

Then the plant is kept in a shady place with good nutritious soil which is required for the plant Buxus to have harmonious proper development.
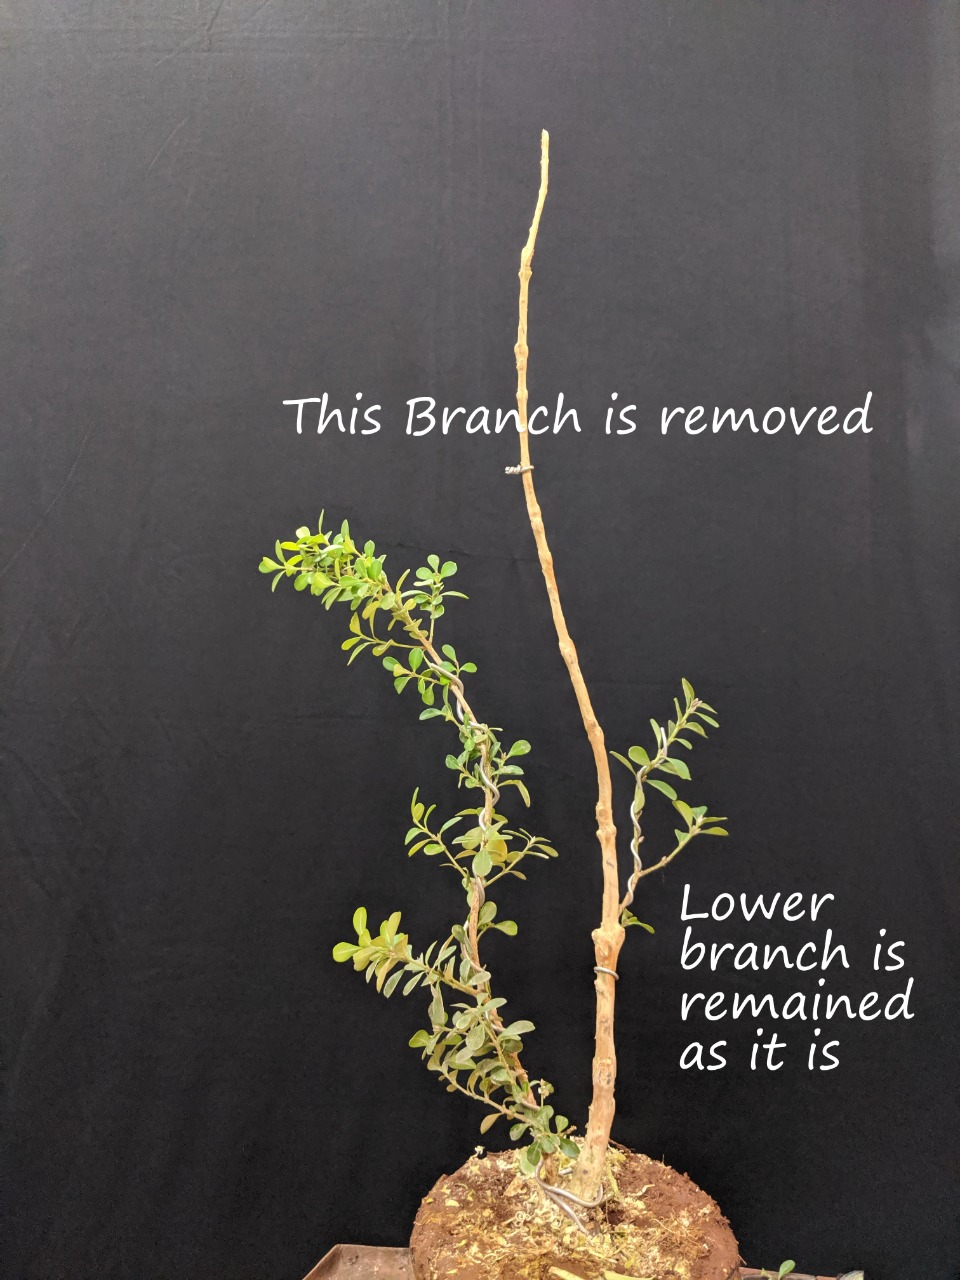
After Six months Lower is kept and allowed to grow. Then top portion of the main trunk is removed.

This is proper development after one year. Buxus is having vigorous grow with many fresh new branches and green leaves. The fascinating curves of Buxus makes the plant more stylish with a unique pot. Bends of the second trunk are in harmony with the shape of the pot.

Apr 29, 2021
Styling Thuja Orientalis ( Morpunkhi ) on A rock penjing

Morpunki it is also called as Thuja orientalis and also called as Platycladus. This is a good Plant for Bonsai. Thuja is of plant like cypress and ever green. In favorable conditions it can be grown as a indoor Bonsai, otherwise it is a little shade loving plant. it can be grow up to 10 to 12 feet. It is a slow growing medicinal plant. The leaves of the plant grown in flatten manner new leaves will have light fresh green color and old ones will be in dark green color.
I bought a Thuja plant from a nursery and thought of making it in to a Bonsai.
Plant Before Pruning

It is a nursery plant. just five years old. This plant is growing from branches, Thuja is slow growing plant with small tiny leaves. giving shape to this plant is little demanding job because of many small branches on the main trunk line. First we have to clean and clear the main trunk line by removing all small , tiny branches. then we get a clear view to wiring and styling of the plant.
After some cleaning we can see some space between branches and that gives a clear view for further steps of styling.

After Some pruning and cleaning
After Some wiring started styling Plant
By bending Morpunkhi , it was given a shape
After styling , its the time to repot the plant to a selected Bonsai pot. The pot and the plant should be synchronize and co exit in a natural way.
This time instead of Pot a lawa stone is selected to place the plant as if it is growing from a mountain.
The Surface of stone is having good structure with small groves.


Select a best suitable place spot and angle on the rock to place the plant and make a grove by carving a notch to fit the plant in the rock.

Plant will be place in this groove.
Remove some of soil and cut down the extra roots and place plant on the stone.
Click on this link for Complete video of making

Apr 16, 2021
How to develop radiating roots on a peepal Bonsai.
Developing Radiating roots on mame /shohin Bonsai
Peepal as Ficus religiosa is a tropical plant . It is a best loved Bonsai of Bonsai lovers. This plant can be made in to a Big Bonsai or small Bonsai. This plant can be grown from seeds, branches, air layering also. It is a deciduous tree sheds its leaves once in a year before spring season. Peepal tree canopy usually grows in umbrella shape giving shade to many animals and people during hot summer months. The life span of a peepal tree is more than 150 years. this tree considered to be largest oxygen provider.

source is google image
Here we can see clearly the development of Ficus religiosa tree roots. This is we can say radial development of roots . it gives the tree a great maturated and older look.
Bonsai is miniature form of a aged plant growing in Nature. Getting a matured look on Bonsai plants takes time, with patience we can develop our Bonsai plant as a Bonsai tree.
Developing Radiating roots gives the plant a great look with good nebari.
How to develop these roots is given in detail with photos and video. with patience we can develop these roots on our Bonsai peepal tree.
Peepal plant was already 5 years old. Height of the plant is three and half inches. It is already root bound and roots are coming out of the pot. Plant is taken out of the pot and long roots are reduced in length. leaving roots at the Base.


Bonsai Peepal is in Bonsai pot

Most of the roots are reduced to fit the the plant in the pot.

One tile is selected and placed under the root base to make the roots to develop roots in all directions radially around the base of the trunk. By placing the tile the development of the roots will be in all directions.

Now the plant placed again in the Bonsai pot.
After six months again the repotting has taken is done.
Below photo is the roots are washed and the tile is again placed back.


Again the plant is repotted in to the same Bonsai pot.

For more development of the roots Mame bonsai is placed in a big pot with soil. watering will be done regularly. The cool soil gives more moisture to Bonsai plant. makes more development of fibrous roots and root thickening takes place.
Video gives in detail step by step of making
Apr 3, 2021
How to Graft a Branch On Bonsai tree
Grafting
Its a magic word. Many of us garden lovers feel like doing grafting on our plants and creating a different varieties. Usually many gardeners do grafting to enhance the plant by creating a new look to the plant and to produce new varieties of plants,. Another importance of grafting is to make the plant to produce more and quality fruits at a early stage. Some times grafting method gives new life to that plant by repairing a damaged area or side of the plant with a graft.
There are different methods of Grafting is there. Each method is having a specific name depending on the type of grafting. Grafting is also horticulture science perfect cut and union plants gives success.
When we are doing Grafting we have to remember there are two parts one is root stock and second is scion. Root stock is the plant which is undergoing graft and scion may be a branch of the same plant or another plant which is going to have union with root stock.

Root stock and scion plays a main role in grafting.
There is a lots of difference between air layering and grafting, In air layering from one plant we are getting two plants. but in Grafting two plants are merging together to become one plant.
In this chapter we are going to learn about Inarching grafting and learning step by step of connecting a branch on root stock of the same plant. usually this procedure is followed by most of the Bonsai
enthusiast. This method helps the plant to have a branch where it is needed.
Usually Bonsai artists use this method , where the trunk line is long and not having any branches and needs a branch. First select the place where we want to graft the branch. mark that place.
With a sharp knife remove the bark where it marked on trunk and the branch. and join them with a tape as shown in the video.

And bring both together and join them with a tape.
The region where graft is done should place to gather with out any air gaps and seal two branch and trunk line together with insulation or graft tape.
Keep this plant in a shade to protect from direct sunlight. Merging or uniting branch to the trunk takes one season, wait till that time.


Then remove the tape gently without hurting the grafted area. Now cut the branch below where grating has done and separate it.


Entire video of grafting is available on link below
After Six months new branch is added to the trunk line


Second branch is also a joined with main trunk line

Oct 9, 2020
How To Make Fringe flower in to Bonsai
Fringe flower is also called as chemise fringe flower, Its scientific name is Loropetalum. it is also called as purple Dimond plant because of its purple leaves. it can be made in to Beautiful Bonsai.
Main characters of the plant
Chinese fringe flower is a ornamental shrub grows up to 5to 6 feet. It can be pruned and can be given a shape. During the sunlight a chemical called anthocyanin is produced that gives a pleasant purple color to the leaves. The flowers of this plant will be hanging beautifully with pleasant pinkish purple color which highlights the plant when its in full bloom.

Sunlight
This plant grows well in full sunlight ,but the afternoon sunlight burns the leaves if the temperatures high and more than 35 degree centigrade, it prefers afternoon shade. Other wise plant grows well in full sunlight. Some of Bonsai artists prefers as a indoor Bonsai by placing the plant on western direction window where you get full proper sunlight. If there no proper sunlight color of the leaves of the plant changes they wont be having that stunning bright purple colour,
Soil
Loropetalum need good drainage ,organic soil for its proper growth. Fringe flowers likes acidic soil. To make soil acidic at least one third quantity peat moss to be added to your Bonsai soil. This plant needs lots of moisture in the soil , so peat moss helps to keep the moisture level constant. here i will share my Bonsai soil ingredients .My Bonsai soil consist of three parts manure one part of garden soil, one part pumice stones of 1 to 2 mm . This is normally used for all my medium size Bonsai plants.
Then for the plants like acidic soil loving plants I will add two parts of peat moss to Bonsai soil and mix them well. This is a good soil for loropetalum.
Watering
The main and important point is while growing Fringe flowers the soil should be moist all the time. During summer months water the plant morning and evening, If the temperature is high keep the plant in shady place and give a shower to the plant.
Care, Cutting and Pruning
This plant responds well to cutting and pruning. perfect time for cutting is early spring. It starts flowering during spring. Usually the plants flowers two to three times a year , before winter, spring and during summer season.

once the flowering season is over cut and prune the branches and give a shape to the plant and make it ready for next flowering season by providing it with organic fertilizers and slow releasing fertilizes. This plant can be grown from branches also . that is the advantage we can make a branch cutting to rooting during late summer before rainy season.
The main important thing to keep Loropetalum healthy is give proper sunlight. too much afternoon sunlight or too much shade makes the plant to loose its bright purple color of leaves.

Then the plant looses its vigor and becomes weak , then there are chances of dyeing back of the plant. Too much sunlight burns leaves and there wont be proper flowering.

Take care of these then your Loropetalum will be a beautiful Bonsai of your collection.
Demonstration of Loropetallum plant in to a Bonsai tree at Sinhgad College Students Council


Jun 22, 2020
Bonsai And Bonsai photoshoot . How to get best photo of your Bonsai. Part 2
In last post we learnt every thing about the Back drop and its colors and how to use that.


Tripod setting for Photo shoot:
Tripod is an important instrument.in photography, if you place your camera on a tripod, , you can easily adjust shutter speed and time with out any jerks. Small jerk also makes your photo shaky without any clear, sharp picture. With Tripod we can adjust of the height the camera with the same level of the plant with its position and angle. Fix camera or mobile in tripod and adjust the height of tripod.

camera focus point and should match with pot level. The plant trunk base should and the camera eye will be in the same level. So plant will be visible as it is. we can get true image with out any Parallax error.

If you are looking at plant from an angle the picture you are getting wont be perfect , In out come photo the plant's image will be at an angle and trunk line can be covered with branches. so its not proper way of getting a good picture.

In the above photograph the focus of camera is going above canopy of the plant. So in out come image of the plant the trunk line looks thin and young.

camera Angle focus is from the Above the plant
Focus of camera in first photo it is on left side, and in second photo it is on right side
The placement of tripod with camera and plant should be in 180 degrees line. If tripod is on right side or left side the image we are getting is not a actual image.
Tripod helps to take good photos when there is minimum light in the room, that time we need more shutter speed. When using camera with hand slight movement also reduces shutter speed, resulting in blur or grainy images.If camera is placed on tripod there wont be any movement of the hand, On tripod minimum amount of movement resulting best photos of Bonsai plants. If you dont have tripod there many home made tripod videos are there online, you can check them. you can make your own. The main use of tripod is stability for camera with least motion and best photo shoot..

To be continued in next posts with other tips like tripod placement and exposure etc.....
Subscribe to:
Posts (Atom)