Bonsaikapilaas : mango bonsai
='data:blog.title' itemprop='name'/>

pinterest

Showing posts with label mango bonsai. Show all posts

Jun 22, 2020

Bonsai And Bonsai photoshoot . How to get best photo of your Bonsai. Part 2

In last post we learnt every thing about the Back drop and its colors and how to use that.
Tripod setting for Photo shoot:
Tripod is an important instrument.in photography, if you place your camera on a tripod, , you can easily adjust shutter speed and time with out any jerks. Small jerk also makes your photo shaky without any clear, sharp picture. With Tripod we can adjust of the height the  camera with the same level of the plant with its position and angle. Fix  camera or mobile in tripod and adjust the height of tripod.


camera focus point and should match with pot level. The plant trunk base should and the camera eye will be in the same level. So plant will be visible as it is. we can get true image with out any Parallax error.


If you are looking at plant from an angle the picture you are getting wont be perfect , In out come photo the plant's image will be at an angle  and trunk line can be covered with branches. so its not proper way of getting a good picture.


In the above photograph the focus of camera is going above canopy of the plant. So in out come image of the plant the trunk line looks thin and  young.
camera Angle focus is from the Above the plant


Focus of camera in first photo it is on left side, and in second photo it is on right side  

The placement of tripod with camera and plant should be in 180 degrees line. If tripod is on right side or left side the image we are getting is not a actual image.
Tripod helps to take good photos when there is minimum light in the room, that time we need more shutter speed.  When  using camera with hand slight movement also reduces shutter speed, resulting in blur or grainy images.If camera is placed on tripod there wont be any  movement of the hand, On tripod minimum amount of movement resulting  best photos of Bonsai plants. If you dont have tripod there many home made tripod videos are there online, you can check them. you can make your own. The main use of tripod is stability for camera with least motion and best photo shoot..


To be continued in next posts with other tips like tripod placement and exposure etc.....

Jun 21, 2020

Bonsai And Bonsai photoshoot . How to get best photo of your Bonsai.

Photographing A Bonsai : Once we finished shaping Bonsai Plant, we feel like capture the beauty of our creation in a frame. Here I am sharing some important points of Photography . These I learnt with experience, I would like to share with you all. We can start our photography shoot with our mobile. we don't need any expensive camera, Simple camera is also makes lots of difference. Then a normal simple tripod of for stable photos. For taking  good photos one need not to be a great photographer just follow some easy steps and your Bonsai photos will be marvelous. 
Back drop for photo shoot : First to show your Bonsai clearly with depth we should have a solid back ground with out any distractions. If you have plain wall that also makes a good back ground. Otherwise next step we can use Black or White colour or any other colour of plain cloth is makes a superior back ground.  when you selecting a cloth it should not be a shiny cloth, because it reflects the light.  
 
The cloth can be a velvet or 100% cotton cloth or Lekera cloth is gives a best back ground. Some times if your Bonsai is small then our coloured chart paper is perfect as a back drop. Back drop should be hang from a stand or with some support . please try to hang the cloth  straight down with out any folds.. The folds distracts the view of  main image. Our Bonsai plant can be placed in front of the backdrop on a table. We can put same cloth on table and place the plant on table. Then complete back ground will be full black and entire viewers concentration will be on Bonsai plant. Some times we can place turntable on the this table, that also gives a elegant look.

 In this photo table is covered with the same backdrop cloth

A turn table is place on the first table to place Bonsai plant

Chart paper also can be used as back drop in photography.


One more option is we can place glass sheet below Bonsai plant with black or white back drop, the reflection of the plant in the glass gives a beautiful look.


Here below we can see a detail view of White and Black drop . Both of them are good . according to our interest we can use any back ground. So always one back drop without any interruption is compulsory to show your beauty of the Bonsai  plant. 
 
To be continued in next posts with other tips like tripod placement and exposure etc.....


Jun 17, 2020

How to Grow Mango Tree as a Bonsai Tree Part Two


Mango Bonsai

Mango Bonsai. mango plant known as Mangifera indica and commonly known as mango. the life span of a Mango tree is  300 years.

Mango as Bonsai was my dream when I started learning Bonsai art in 1990. That time News paper was our search engine. looking for Bonsai learning classes and for Bonsai exhibitions in newspapers and to contact them by landline phone. I joined our Local  Kalpataru Bonsai Study group, which was managed by Mrs. Purandhare Madam and Mr. Subhas Kulkarni. They had very good collections of Bonsai plants, which they created and displayed beautifully. We as a group attended all seminars of Mumbai conducted by Mrs. Jyothi Parekh Madam and Mr. Nikunj sir.  Interacting with Bonsai masters Susumu Nakamura San and Mr. Peter Chan and learning new techniques were memorable movements in my life. Then slowly My balcony started filling with Bonsai Babies. Every weekend visiting a nursery became a religious practice.
One day when we were visiting Pune University Nursery my eyes fell on a Mango plant that was already in the flowering stage. We bought it and brought it home.
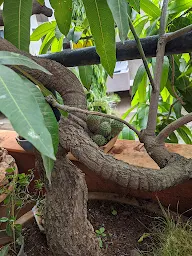
My first thought was to put it in a Bonsai pot and do wiring, As soon as I bought home I made bonsai soil with garden soil, manure, and brick pieces. Took out the plant from the garden bag, cut some roots, and kept it in a Bonsai pot, I was very happy to have a Mango BonsaiWhen I bought the plant it had only three branches. That year for the first time my Bonsai Mango plant has given fruits.

                                                          
Then with lots of interest started wiring the plant and given a shape. and allowed plant to grow. Mean while wires of the plant went deep into the branches, it became late when I realized. Still three years back wire marks were there on the trunk of the plant.


Now these wire marks slowly merging with bark of the trunk line.     
                         
                     
 The plant is slowly changing its style. Every year after fruiting season is over, I cut some of the branches, give the plant some organic fertilizer, and prepare it for next season.
Fertilizers 
The Mango tree flowers usually start in August to go up to March. So start fertilizing the plant with fertilizers. 
Fertilizer for Plants growing from seed :                                                                                
If the plant is growing from the seed, more nitrogen-based fertilizer should be given for  8 to 10 years for proper foliage growth and to strengthen the shoot system.


Then after increasing the phosphorus and potassium fertilizer ratio to the plant and reducing the Nitrogen of NPK fertilizer. NPK fertilizer means Nitrogen, phosphorus, and potash. phosphorus activates more flower production and Potash increases the strength of the fruit. In addition to NPK, we have to provide the plant with Regular spray of liquid micronutrients. These foliage liquid fertilizers are also very important for the plant to have more flowers and fruits.
Shaping and Pruning of Mango plant 
Once the fruiting season is over, prune down the branches and allow the plant to have more new branches. it helps the plant to have more fruits. fruiting plants have more dry branches, remove all the dry branches. Try to remove some vertical branches because vertical branches make the plant bushy, So sunlight can’t enter inside the plant, which makes the plant to lose some branches by drying out, That is the reason we see many dried branches inside the plant. Allow the plant to spread horizontally those are the fruit-bearing branches. Prune down the branches which are downward facing they won't bear more fruits. Remove diseased branches. Don’t make drastic pruning on the plant like 2 to 3 feet, just cut 2 to 8 inches length of the branch backward depending on the length of the branch. sun-exposed branches give more healthy fruits, For shady plants we have to do more pruning to have vigorous growth. Allow the branches to grow at 45 degrees to a 60-degree angle, these branches have more sunlight because of its angular growth, which means more buds and more fruits.
Re potting of Mango Bonsai
When the plant is young re-potting is to be done once a year.  Once the plant attains maturity, means, that after the plant attains the age of 7 years once in two years re-potting makes the plant get more healthy roots and shoots. Then after 10 years, re-potting can be done once in three years. Sometimes we can remove topsoil by two to three inches and fill it with fresh top Bonsai soil. Mango plants grow in a large variety of soils, but best is little acidic soil. Sometimes Mango plant grows in little alkaline soils. The main important key for soil is It needs well-drained, with more organic manure making the best soil for mango plants. 

            Happy Mango Bonsai Growing
Re - potting of the Mango plant will be explained in detail next chapters......