Bonsaikapilaas : #bonsaiplant #HomemadeInsecticidesfor ourBonsaiPlants #insecticidesforBonsai
='data:blog.title' itemprop='name'/>

pinterest

Showing posts with label #bonsaiplant #HomemadeInsecticidesfor ourBonsaiPlants #insecticidesforBonsai. Show all posts

Oct 5, 2021

Shohin Bonsai and its sizes and making a Shohin/ keishi Bonsai.

Bonsai is an Art of Making Plants small and giving them a form of natural look to the plant. It's a skilled art and how Nature Plays a main role in shaping plants. Bonsai Art Plants acquire a Tree shape in the master's hands just like in Nature. We are trying to keep our Bonsai Plants as natural as a miniature form of Nature 


Bonsais are divided into three groups depending on height are as 

Big Bonsai


Medium Bonsai


Shohin Bonsai.


Sunday We had a Shohin Bonsai workshop. This time our topic is How to make Small Bonsais, taking care of them was demonstrated and practically explained in detail. Here Are all details of Small Bonsais. How many sizes are there and how to make them.

Actually, Bonsai is a small miniature tree, then shohin Bonsai is still a miniature form of Bonsai. Some of the world-renowned Bonsai artists have only Shohin Bonsai nurseries. Just like for Big Bonsais Many awards were there for small Bonsais. 

Now we will see how to make a Beautiful Shohin Bonsai. Shohin Bonsai is generally divided into three categories depending on the height of the plant

1) Shohin Bonsai 

The general height of this plant is 12 inches. Shohin Bonsai can be carried with a hand . This general rule is that Bonsai which is carried with a hand is called shohin bonsai.


2) Mame Bonsai ..

 It is also called Bean Bonsai. The height Of this Bonsai is 6 inches. Mame Bonsai is a smaller Bonsai than Shohin Bonsai. It can also be carried by hand.


3) Shito Bonsai. 

The height of this Bonsai is considered 3 inches. This Shito Bonsai is smaller than Mame Bonsai, it can be carried in a palm.


4) Keishi Bonsai

The height of that Bonsai is 1 inches. Kenshi is the smallest of shito and this Bonsai can be held on a finger.


Selection of  Shohin Bonsai .
Seeds
Growing small Bonsai from seeds is the best way to grow them. The plants growing from seeds can be trained the way we want. We can give a shape in the initial stages when the trunk line is thin and bendable. The trunk can be given a beautiful curve. As the plant grows, select the branches from the base of the trunk, being its small size we need more styling and more branches on the trunk. the seed starts developing leaves and tip buds. Let the plant develop three to four leaves and remove the top bud, then more branches will start growing, shaping them. keep the size of the plant smaller as you want to make it into a smaller Bonsai.
Mame Bonsai Plants growing from seeds


Branch cuttings : Growing Plants from branch cuttings is a common method. Most plants can be grown from Branches. Take a Branch cutting of 2 to 10 inches. For Shito and Kishi below 5 inches in height is preferable. Apply root to all hormones,  keep it in soil and coco peat mix, and keep the soil moist. If the soil is moist there will be good development of roots. When the branch has started growing, give it a shape and after it attains the style you want you can shift it into a Bonsai pot.  
Ficus Ramphi is growing from a cutting. All most all Ficus varieties can be grown from branch cuttings.


Wild collection: Wild collected plants are the best Bonsais. They naturally become dwarfed by environmental forces like storms, winds, and animals. These Plants when collected are already many years old and we will have a good-aged Mame Bonsai. These can be collected and can be trained into mame Bonsais.   This is a wild collected Ficus pili khan.

Grafted Plants : Grafted Plants like china focus and ginseng ficus are grafted plants , they can be made into shohin or mame Bonsai. 


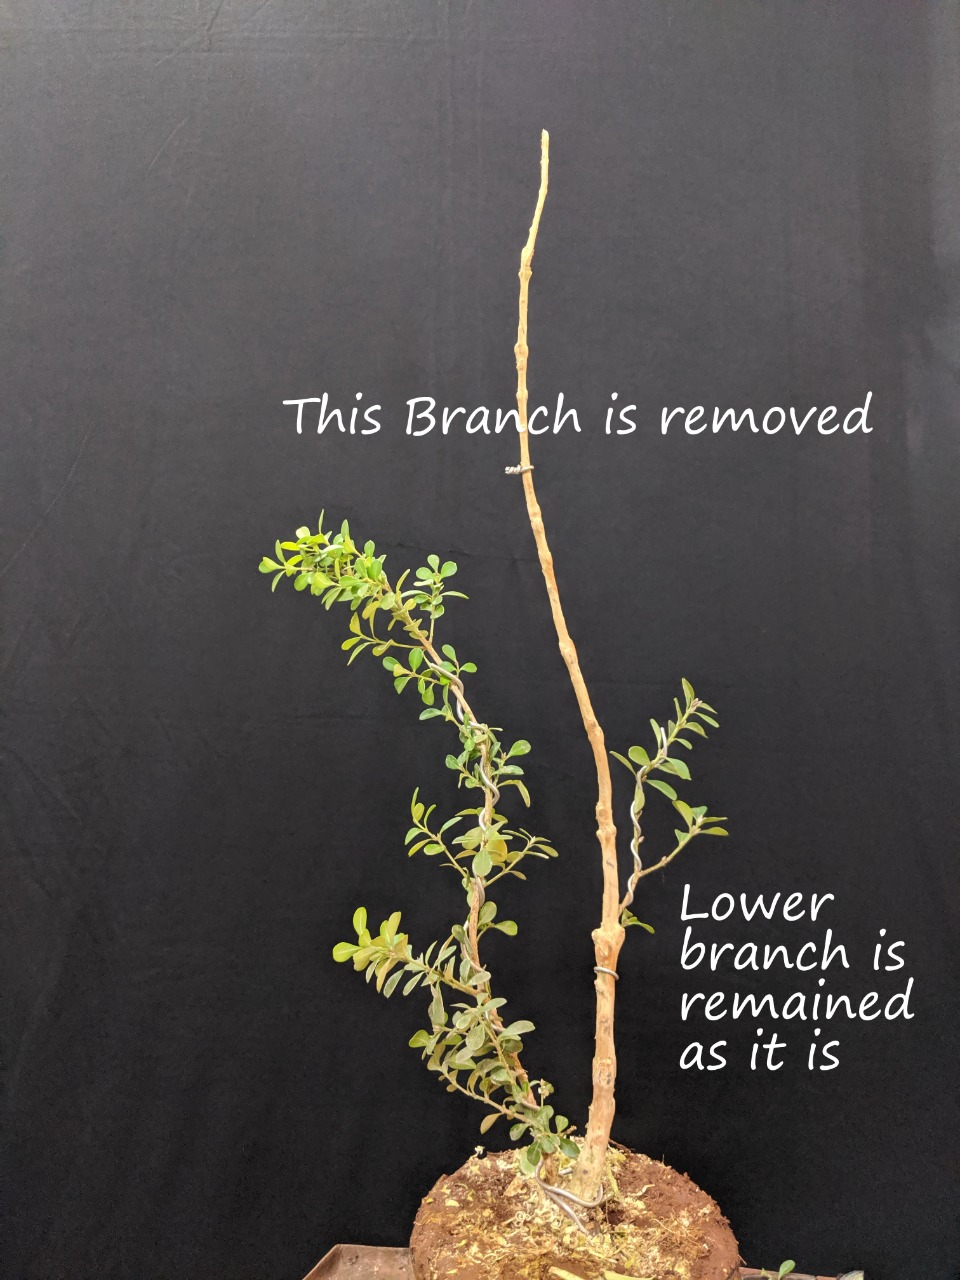
Nursery Plants are always readily made into Bonsais. We can buy a plant from a nursery and reduce the height by cutting down the length of the plant and doing some pruning and wiring to give it a shape. Then some pruning and shaping make the plant a beautiful Mame Bonsai.

Names of Plants for Shohin Bonsai and Mame Bonsai. 

The best plants are small-sized leaves plants because their small size plant looks small and attractive miniature Mame Bonsai. The leaves of Big leaves plants take time to reduce in size. Plants like peepal which have big leaves can also be made into Shohin Bonsais.

Buxus, Serissa foetida, Carmona, Jade, Ficus microcarpa, Adenium, Pomegranate, Bougain villea, Chinese Elm, Pine, Ginseng ficus, Premna.

Mame Bonsai soil: Mame Bonsai pots are very small, so they should have soil that can hold water and good fertile and good drainage for proper growth of roots and the plant. Peat moss holds moisture, cocopeat helps for good drainage and the garden soil provides organic matter for the plants to grow. The best composition is one part of the garden soil, one part of the cocopeat, and one part of peat moss. 


Wiring and pruning a small Bonsai is challenging work because of its size. The clip and grow method is best suitable for most of the mame bonsais. There are very pretty creations of their small size and need lots of maintenance. All most all these Bonsais are growing in a small pot so once you water them within ten minutes water drains out and the soil becomes dry.  If the soil is dry growth of the plant won't be proper. To maintain them properly keep all these plants in a shallow plate with pumice stones or brick pieces, and maintain a level of water halfway into the stones. another method is in a big pot put the Bonsai soil and keep the pants in the soil. In both Methods moisture from the down of the pot keeps mame bonsai cool. it helps the plant to grow healthily. Regular interval feralization is very important for these plants.  


Here link is given to shape a Plant into Shohin Bonsai. 

https://youtu.be/5YdmDB9VVJs


Jun 27, 2021

Rock grown Bonsai Peepal tree Bodhi vrush with Rock.

Bodhi Vrush Peepal plant Ficus is growing on Rock


Rock grown Bonsai gives Bonsai plant a natural look 
For Rock growing Bonsai , the selection of the plant is important , with long roots, so the roots can be spread on the services of the rock. Bodhi vrush it is also called as peepal tree. It a  tree with good roots system and was brought from a nursery.

This is one type of sand stone. It is selected because of its  shape and structure


For roots over rock style plant needs long well developed roots to spread on rock


Trying Many Faces of the stone for perfect placement of plant on the rock 


Fixing the plant with rock is important to develop a stable root system. If roots are loose  or hanging there wont be proper growth.


 Bonsai pot is selected and place the plant in the pot.

Place the rock with plant roots should touch the soil in the pot , then roots gets proper nutrition.


Development of the plant after three months.


May 27, 2021

Creating a Naturalistic Penjing with a Hand made Brick wall and Bonsai plant


Creating a Naturalistic Penjing with a Hand made Brick wall and Bonsai plant


Brick walls prepared for the use of Bonsai Land scape


Our Villages are having Beautiful Nature. Bonsai artists Natural Lovers. They are creating their Bonsais as natural as in Nature. This penjing is one of its creation. 

Material required

First Preparation wall is important. It is very simple. we need 
1) Cement and white cement 
2) Earthen cement color powder
3) Fine Sand
4) Plastic or Iron Mesh 
5) Brush, Trowel 


4) Wooden frame 


These are three different sizes of frames. It is better to make a wooden frame of your choice. then your wall will be of correct size and shape without any crooked edges.

Preparation of the Wall

One cup of cement
1/4 cup of sand
Color as required 
Mix them well and start adding water little by little and mix it properly


Take a plastic sheet and on it place a news paper and kept the frame on news paper .  Now a thin layer of cement to be filled by Trowel inside the frame. Spread it evenly as shown in video.


After Making a thin layer place the mesh of the wet cement, It helps to hold the Wall strong.


Now Again fill the Frame wit cement layer by layer with Trowel by spreading evenly, in between spray little dry cement powder on wet cement and spread it nicely.   


Make sure the thickness of the wall you want have , if it is more thick then wall becomes heavy,  so make medium thickness  and let it dry for 20 minutes. when the cement becoming a little dry draw straight lines with a knife or any wooden or metal stick so the lines will be of thin as shown in the photo.


After finished drawing the lines let the cement dry completely for a day water it next day.  Then check the cement. once it becomes dry take out the wooden frame, dry the wall completely. once it is ready our rectangular wall is ready.

Second method 

In this Method we removing the edges of the wall when it is still wet. 


This photo reminds us the aged wall structure. To get this when we finished cementing wait for 20 minutes and draw the lines. at that time select the edges of the wall which bricks you want to remove, Other wise remove randomly with a knife. Insert the knife in to wet cement and remove that piece carefully without damaging the wall. ow let the wall dry fully and and we can use for our landscape Bonsai styles.

How to make a white color Wall


If  we want to make a white wall dont mix any color in to cement use as it is and and after finishing making a wall when it is wet put white cement little by little on wet cement and spread well. After 20 minutes draw lines on white cement ad make it as a white wall, Now our white color Wall is ready . 


Four Different sizes of Bonsai walls are ready for our Penjing.


These are plain straight walls without any hole in middle. 
I will share the another post of white walls with a hole to place the plant with roots coming out of the wall.


May 12, 2021

ART OF MAKING A BONSAI PLANT


ART OF MAKING A BONSAI PLANT

I am explaining the art Bonsai art through the photos for the beginners . It is a live art . With imagination one can create beautiful Bonsai.

This is a hard plant , it can be grown from the branches also. The plant has compact small leaves which is good for making Bonsai. Depending on height , bonsai plants are divided in to three sizes , one is Big Bonsai, second is Medium Bonsai, third is small Bonsai , it is also called as Mame Bonsai. First keep the plant in front of you and think for a while how to shape the plant.

Start wiring the plant branches with aluminium wire. Bend the Branches gently with two hands with one and placing underneath the branch, please don't harm the branch, one should be soft towards these plants and handle them just like small kids.

In detail you can check it on this below link

/ART-OF-MAKING-A-BONSAI-PLANT

https://bonsaiart.quora.com/ART-OF-MAKING-A-BONSAI-PLANT

May 7, 2021

 Buxus microphylla is plant of  small leaves bushy plant. Its slow growing . Usually used for hedges and can be given a beautiful shape and challenging plant to grow as a Bonsai tree. Common nursery name of this plant is china box.

Making challenging Plant to a Bonsai is definitely a demanding  work for Bonsai lovers. Plant grows up to 6.5 feet tall. Branches are strong and needs little heavy gauge wire to bend. It is having a strong wood cambium. Good for making shari and Jin on the trunk line and branches. 

The most important point is this plant needs moist little alkane soil and grows well in shady place. Well drained soil is good for proper root growth. It prefers high dose of Nitrogen as fertilizer.

This is a nursery grown plant and is growing from branches. Buxus can be grown from seeds and branches.

Here Buxus is having twin trunk . Main trunk long and thin. Most of the branches were removed ,only one branch is selected and given a shape by wiring.

Then the plant is kept in a shady place with good  nutritious soil which is required for the plant Buxus to have harmonious proper development.

After Six months Lower is kept and allowed to grow. Then top portion of the main trunk is removed.


This is proper development after one year. Buxus is having vigorous grow with many fresh new branches and green leaves. The fascinating curves of Buxus makes the plant more stylish with a unique pot. Bends of the second trunk are in harmony with the shape of the pot. 


Apr 16, 2021

How to develop radiating roots on a peepal Bonsai.

Developing Radiating roots on mame /shohin Bonsai 
Peepal as Ficus religiosa is a tropical plant . It is a best loved Bonsai of Bonsai lovers. This plant can be made in to a Big Bonsai or small Bonsai. This plant can be grown from seeds,  branches, air layering also. It is a  deciduous tree sheds its leaves once in a year before spring season. Peepal tree canopy usually grows in umbrella shape giving shade to many animals and people during hot summer months. The life span of a peepal tree is more than 150 years. this tree considered to be largest oxygen provider.

source is google image 

Here we can see clearly the development of Ficus religiosa tree roots. This is we can say radial development of  roots . it gives the tree a great  maturated and older look.
Bonsai is miniature form of a aged plant growing in Nature. Getting a matured look on Bonsai plants takes time, with patience we can develop our Bonsai plant as a Bonsai tree. 
Developing Radiating roots gives the plant a great look with good nebari. 
How to develop these roots is given in detail with photos and video. with patience we can develop these roots on our Bonsai peepal tree.

Peepal plant was already 5 years old. Height of the plant is three and half inches. It is already root bound and roots are coming out of the pot. Plant is taken out of the pot and long roots are reduced in length. leaving roots at the Base. 


              Bonsai Peepal is in Bonsai pot                            


                                  Most of the roots are reduced to fit the the plant in the pot.


One tile is selected and placed under the root base to make the roots to develop roots in all directions radially around the base of the trunk. By placing the tile the development of the roots will be in all directions. 


                                             Now the plant placed again in the Bonsai pot.
After six months again the repotting has taken is done.
Below photo is the roots are washed and the tile is again  placed back.


Again the plant is repotted in to the same Bonsai pot.

For more development of the roots Mame bonsai is placed in a big pot with soil. watering will be done regularly. The cool soil gives more moisture to Bonsai plant. makes more development of fibrous roots and root thickening takes place.
Video gives in detail step by step of  making