Bonsaikapilaas
='data:blog.title' itemprop='name'/>

pinterest

Jan 13, 2025

Make Banian plant Bonsai in 3 simple steps

As a tropical plant collector, Collecting a Banian plant is easy. the wild-collected plant is called as Yamadori. It is a Japanese word used for collecting plants from forests.

We find it in many places on the walls of old houses, bridges, or roadside.

Bring the plant home, put it in a garden pot, and let it settle.

After 6 months, give her a shape, keep it in a Bonsai pot. and watch it

Banian plant transforming into Bonsai. This style was achieved in 8 months.

The three main points for better development are,

To provide her with good fertile soil and
Shape her and give a proper style with wiring.
Make a habit of fertilizing the Bonsai regularly.
All these play a vital role in Bonsai's development.


Wild collected Yamadori Banian tree


After some time the plant is wired and shifted to a Bonsai pot. Any time Don't think Keeping a Bonsai plant in a pot interrupts the growth of the plant


As you can see the growth of the plant is well achieved, and the Banian is growing healthy in proper style.

Nov 4, 2024

The Journey of Peepal Plant from Yamadori to a Bonsai Plant

Bonsai is the art of shaping a plant using our creativity and imagination to transform it into a beautiful live art piece. We collect plants from the wild, which are known as Yamadori. These plants often have excellent structure, and because they grow in their natural environment, they develop well-formed trunks at the base. Yamadori plants are unique and highly sought after by Bonsai enthusiasts. 

For instance, this peepal plant was collected from the roadside in Vishratwadi, Pune, by our Yamadori collector, Kapil Krishna Gawas, on March 6, 2022.


It was collected and potted in a garden pot with garden soil and proper care was taken.


This photo was taken on 9th April 2022. The plant lost its leaves due to a severe summer, a change of soil, and repotting. Still, it is trying to settle into its new environment. 


On 12th May 2024, it came to my place with new branches at the base and top.   

 On 9th June 2024 long branches were trimmed down, The base of the plant is so charismatic with a good aged look. that is the main attraction of the plant, keeping that as the focal point, the branches were pruned down, and now the base looks thicker. the expected gradual development of branches and more overall growth of the plant.

   The Peepal tree responded quickly to new soil and regular fertilization. By 31 July, there was more greenery, and plenty of new branches were developed. its looking healthy with new fresh leaves.

 Primary Branches were selected and given wiring to have a proper well balanced shape. Secondary small branches were also wired with thin gauge wire. Today on 29th November 2024 the overall look of the Peepal tree is changed. The Peepal Aswath Vrush is very attractive and graceful.


Aug 16, 2024

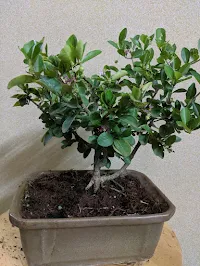
A potted plant is on the way to Bonsai, Murraya Exotica /Kamini


Murraya exotica commonly called Kamini Bonsai. It is a nursery plant. it is growing in a garden pot. thought of making it into a Bonsai, primary shaping has been given by pruning big branches, and a primary shape was given. Secondary pruning was given after two months. now the plant is looking to get the shape of a tree. Still, the plant is in the garden pot and is allowed to grow. Next spring, the plant will be shifted to Bonsai pot.

Jul 8, 2024

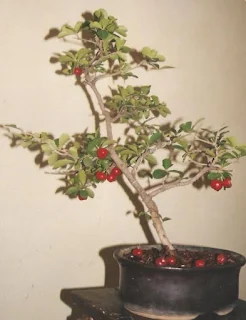
Barbados Cherry Bonsai development all through the years


Barbadus cherry Bonsai development is explained all through the years.Barbados cherry ( malpighia emarginata )  plant is a sub-tropical small tree that gives small edible fruits, it is an evergreen tree that provides fruits two times a year. It can be made into a beautiful fruiting Bonsai. The leaves are very attractive and glossy.  Barbados cherry trees can be made into different styles with attractive fruits. 


Bright red fruits made me buy this Barbados cherry bonsai tree on May 28th, 2018. It was a small plant with only three branches and beautiful fruits hanging on. This is a branch air layered from the mother plant. This charming beauty of fruits attracted me to bring it home.


Brought it home and kept it in a Bonsai pot with fresh Bonsai soil with the thought of making it into a Bonsai tree. 

After one year that is 2019, the plant started growing nicely, it has given many branches and five petal pink colour flowers. then they became red berries and started hanging from the plant The delicate flowers hung beautifully from the branches, swaying in the gentle breeze.


In 2021 reporting was done to encourage new growth. The trunk line is given a new look by removing small branches on the trunkline and by keeping some selected primary branches the overall look of the plant is changed. 


In 2021 as the season unfolded, I encouraged the right branch to grow longer and longer. It has given a different look to the look to the plant. It is not a sacrificing branch. My idea for developing this branch is, to expect many flowers and hanging berries, It's a great transformation, with a unique style formation.

2023 there is more development and constant pruning,  keeping the basic shape of the Bonsai, After doing some pruning on primary branches, the plant has started developing secondary branches. On secondary branches, there are small third-generation tertiary branches that started growing. Still, the plant is in the developing stage of pads on branches.

 
Sometimes trimming keeps the plant in shape, actually trimming is cutting away over the growth of the Bonsai. 

Once the fruiting season is over, trim the branches and prepare the plant for the second season of fruits. Fruiting plants need fertilizers of phosphorus and potassium, which are the activators for producing fruits. 

I am sharing the Barbados cherry Bonsai growth over six years. It might have grown a thick trunk if I kept this Bonsai in a big pot for its fast development. 

I have limited space, so growing Bonsai in a large pot is not feasible for me. I believe if we have given proper care over many years, bonsai trees even flourish in tiny Bonsai pots.  

Feb 17, 2024

Transforming wild Elegance nursery Jangle jalebi plant into Beautiful Bo...


The plant name is Pithocellobium or manila tamarind or Jangli Jiledi. Brought from a nursery, I was attracted to the leaf's color and butterfly-like leaves. Always use sharp and clean tools when pruning to avoid damaging the tree. Take your time and step back occasionally to assess the overall shape and balance. Remember that bonsai pruning is an art, and it's important to strike a balance between maintaining the tree's health and creating a visually appealing landscape. Occasionally, top pruning (removing the apical bud or tip) can help control the height and encourage lateral branching, promoting a fuller and more compact appearance. Different species of bonsai may require specific timing for pruning. Generally, spring and early summer are good times for major pruning, while light maintenance pruning can be done throughout the growing season. Regularly inspect your bonsai for pests and diseases. Pruning can also involve removing infected or damaged parts to prevent the spread of issues. Perform regular pruning to maintain the desired shape and size of the bonsai. This helps control the growth and ensures that the tree remains in proportion with its container. Turning a nursery plant into a bonsai is a rewarding process that requires patience and ongoing care. With time and attention, you can cultivate a stunning miniature tree that reflects your artistic vision. Gently remove the plant from its nursery container, carefully not to disturb the roots excessively. Root Pruning: Trim the roots to promote a compact root system. Remove any circling or overly long roots. This encourages the plant to develop a more shallow and dense root structure suitable for a bonsai. The soil in this area where the growing plant is dense and clay-like, making it difficult to remove with a rake as it is not loose. In the case of loose soil, removal would have been easier. However, since the roots are deeply embedded in the sticky clay soil, the most effective method to remove excess soil around the trunk is to use a hexa or a saw to cut through the soil. This way, the goal is to keep the roots near the trunk without causing any disturbance to them. To encourage fibrous root growth, it is necessary to remove some of the large, mature, and thick roots that have developed around the pot. It is essential to remove both the entangled roots and the old soil to facilitate the development of a healthier root system. And the plant shifted into a Bonsai pot with fresh Bonsai soil. Here we are seeing the plant after 15 days of repotting. Now the plant lost some of the leaves after repotting. it's normal for plants to temporarily stop growing after repotting, This is because repotting can be stressful for plants. The stress can cause roots to get damaged and fail to absorb enough water, which can lead to wilting leaves. This is known as transplant shock. Here are some tips for helping your plant recover after repotting: • Water thoroughly after repotting to help the soil settle around the plant's roots. • Place plants in a cooler, shadier spot during the recovery period. • Don't fertilize or overwater during this time as the roots need to recover. • Mist the leaves with water to help increase humidity around the plant. Plants will recover in 2–4 weeks. We have seen the step-by-step development of Jangli jalebi, as it progresses, I will share with you the development of the Bonsai. Thank you, friends, for watching. We will meet you in the next video. Till that time take care and have a great weekend.

Nov 15, 2023

Winter care for our Bonsai plants.

Winter care for our Bonsai plants.

Yes, we should be careful about not only indoor plants but outdoor Bonsais also. In Winter due to short daylight and cold temperatures plants can't prepare much food so they don’t need much water. We can reduce water and water the plant when the soil is dry.  

It is time for the attack of insects like aphids, white flies, red spiders, Millie bugs, and thrips on the Ficus plant ( we see folded Ficus leaves, the eggs will be inside the folded leaves).

 If any insect attack is there

1)     Wash the plant with a water jet

2)     Remove the affected leaves.

3)     Spray homemade insecticide.


Cutting and pruning can be done if the plant is profusely growing.  Old wires can be removed.

Fertilizing to be reduced.

Repotting can be postponed to next season.

Friends take care of the plants during the winter season.

It important is to keep our plants away from insect attacks by watching leaves on top and down portions from time to time.


Happy winter growing and enjoy the season with our beautiful Bonsais.


Jul 21, 2023

How to develop aerial roots on Bonsai Ficus plants

 Rainy Season. Our Bonsais are happy to receive rain. because rainwater is the purest form of water when it falls on our plants directly. It's the Best season for the development of aerial roots on our Ficus plants. Lots of humidity is there in the air which helps the plant to produce more aerial roots. Long straight roots hanging from the Ficus plant add more age to our Bonsai. Aerial roots can be grown straight with a straw. It is a simple and very useful technique. To develop more and more aerial roots on your Bonsai, place your plant on a pebble tray filled with water during this monsoon season.

when they started developing...
Ficus develop aerial roots during the Monsoon season. When aerial roots are developing if you place a straw They grow straight deep into the soil. that gives a grownup look to our Bonsai. Straw being transparent we can see the growth of the root. once the straw is placed don't move or disturb the straw because the aerial roots are very fragile. Sometimes for top branch aerial roots, one straw is not enough. then we can use two straws putting one straw into another.
Step by step explained with photos


Jul 6, 2023

  I am sharing the development of Adenium from 2018 onwards. When I bought it, it was having a thin stem and tall branches. Then, the two tall branches were removed.  Slowly, the caudex started thickening, and many branches developed near the cut. Allowed to develop and started wiring to give a style. Now it is a Shohin Bonsai of 9 inches with a thick caudex stem. Sharing the photos


Jul 2, 2023

Thickening the trunk line of a Bonsai plant

 Bonsai is such a beautiful art of growing huge trees in a shallow pot. Most of the time, Bonsai looks so natural with a good thick trunk line. The trunk should be thick from the base with a fine tapering stem.

The thickening of the trunk happens with age with the regular cell division of vascular tissue present between the Xylem and phloem. This Vascular tissue plays a main role in widening the tree trunk with the age of the tree. When resources like water, sunlight, and nutrients are available as per the need of the plant, then the growth will be rapid, and the width of the trunk enlarges.

 1) Growing in the ground: The first and most reliable procedure is Growing the plant in the ground. If you have a big garden ground dig a pit and place a plastic sheet with some drainage holes and fill it with fertile soil place the plant and leave it for a few years, When you are pleased and satisfied with its growth make it a Bonsai. This technique makes the trunk grow faster in less time.

        2) Growing in a big garden pot or bag: Another way for the Bonsai lovers who have less space is to Keep the plant in a big pot and fertilize it from time to time and provide the plant with fresh soil once in two years. Allow it to grow freely and when you are satisfied with its growth make it into bonsai. This procedure also makes the bonsai have a good trunk line in a much shorter period.

        3) Growing a scarifying branch: A scarifying branch is a branch that allows it to grow near the base of the trunk and can be removed once the trunk achieves the required thickness. Select a primary branch at the base of the trunk and allow it to grow.  To have a 2-inch-thick trunk the length of the primary branch should be grown more than two meters and the length of secondary branches growing on the primary branch also be grown more than two meters.  The length of the primary branches to grow depends on the required thickness of the trunk of Bonsai. This technique of growing and thickening Bonsai is to be done in a big garden pot because the development of the plant depends on the growth of the root growth how deep it is growing and the progress of the secondary and fibrous roots.  

        4) Collecting Yamadori: Yamadori is a collection of plants from the wild. A plant is collected in the wild with an attractive thick trunk it will be tall because it was growing in the ground for many years. The height of the plant is to be reduced by chopping it down to half the size of the plant. It gives a ready thick trunk Bonsai, but the plant won’t be having a fine tapering trunk. Then the plant has to be styled and to have wait for development for some years to get a good narrowing trunk line.

          5) Fusing trunks to give a thick trunk line: Select multiple plants of the same species, keep them near to one another, and tie them tightly with tape or wire. The primary branches and secondary branches should not be inside the bundle. If they are inside clear them and keep tall clear trunks without any branches inside when these trunks are tied together. Keep the entire bundle in a big garden pot or in the ground and allow them to grow. After several years of training these trunks will be fused and look like one thick trunk.

Several years of training gives Bonsai a thickened trunk and a good tapering and well-radiating Nebari. Bonsai when it is growing in a shallow pot takes many years to have a beautiful, matured trunkline.  At that time these techniques make to get a good thick trunk line in a little less time.


Video of Fusion of Trunks in Bonsai

Jun 16, 2023

Exora cleaning and giving a fresh look


Exora is a unique wonderful plant to make it into a Bonsai plant. The flowers look so fresh and beautiful they look like a snowflakes . This video is made for Bonsai Beginners: How to fertilize, when to fertilize, how many types of fertilizers are there, and the frequency of fertilizing a Bonsai plant. Everything is explained in detail. When the bonsai plant starts flowering or fruiting the enjoyment of watching the plant doubles. There is lots of hard work and regular maintenance is more important for healthy plant growth. During this journey, the plant needs lots of fertilizers. There are two types of fertilizer. One is organic and the second is inorganic. Both are important. When we do report after some time the fertility of the soil reduces because nutrients are taken by the plant. Beca6plant is growing in the limited soil of the pot. Provide her with healthy growth, fertilizers are important in plant development. Organic fertilizer like cow dung, seaweed, or neem cake fertilizer takes lots of time to mix with the soil. So the frequency of providing fertilizer will be once in three months. Inorganic fertilizer is like instant food for plants. There are two types, one is the main fertilizer like NPK. That is nitrogen, phosphorus, and potassium.. After repotting NPK is important for good root growth and healthy growth in the shoot system. This chemical water-soluble fertilizer should be used in dilute quantities once a month. Then liquid multi-nutrient fertilizer is also needed for the plant. Before using liquid fertilizer read the instructions carefully and start using once a month. NPK and liquid fertilizer are to be used alternatively once in a fortnight. All these fertilizers help the plant to have complete growth and help the plants to have healthy growth and good quality flowers and fruits.